

TikTok Content Creation: Complete Overview
This outline covers all essential factors for producing TikTok content that is professional, engaging, and monetizable. It includes camera setup, lighting, audio, editing, and general content strategies, presented as concise bullet points with short explanations for quick reference.
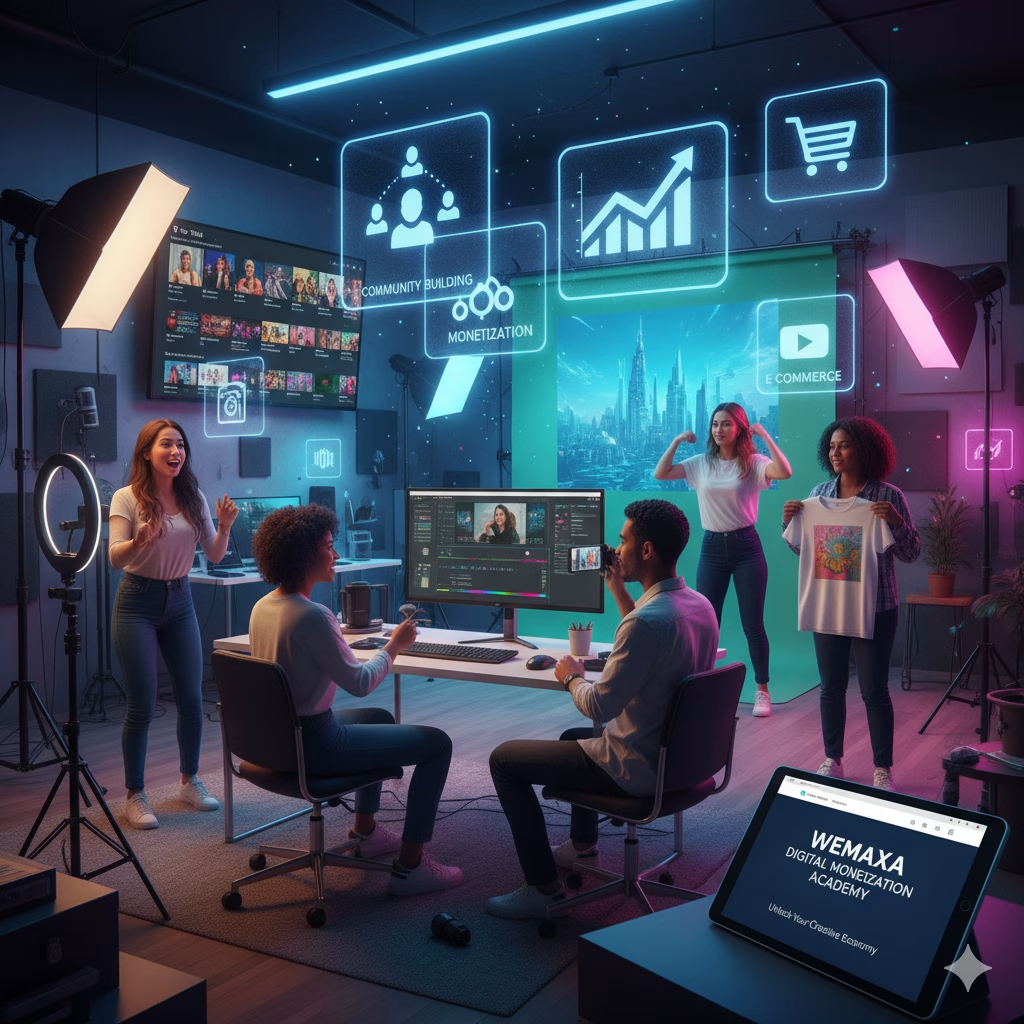
Making Money with TikTok
In this guide we will explain camera and sound setup, editing workflow, content formats that perform well, plus practical monetization channels such as TikTok Creator Rewards, live gifts, brand deals, affiliate links, TikTok Shop, and selling merchandise.
Primary monetization methods
- Creator Rewards Program (TikTok payout for eligible creators)
- Live gifts (viewer tipping during live streams)
- Brand deals (sponsored posts and paid integrations)
- Affiliate marketing (product links with commission)
- TikTok Shop (direct selling on platform)
- Merchandise (own products sold via shop or external store)
Links and resources:
- TikTok Creator Rewards Program (official eligibility and how rewards work)
- TikTok Creator Fund information (official creator fund overview and FAQ)
- How to Monetize Your TikTok Account in 2025 (practical breakdown of monetization channels)
- Reddit thread: TikTok Shop creator success stories (community experiences)
- Reddit discussion: making money from TikTok Shop (affiliate and seller tips)
- Sprout Social guide (context on program changes and eligibility)
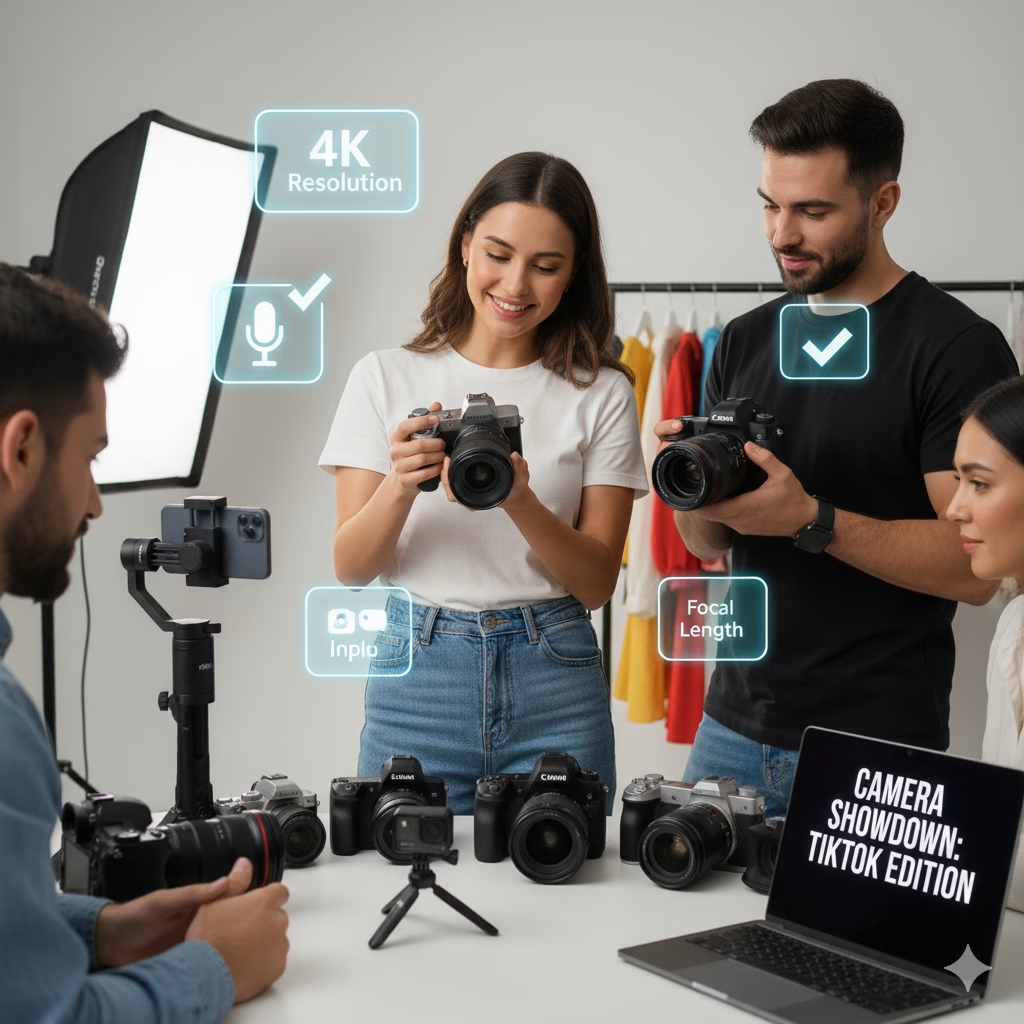
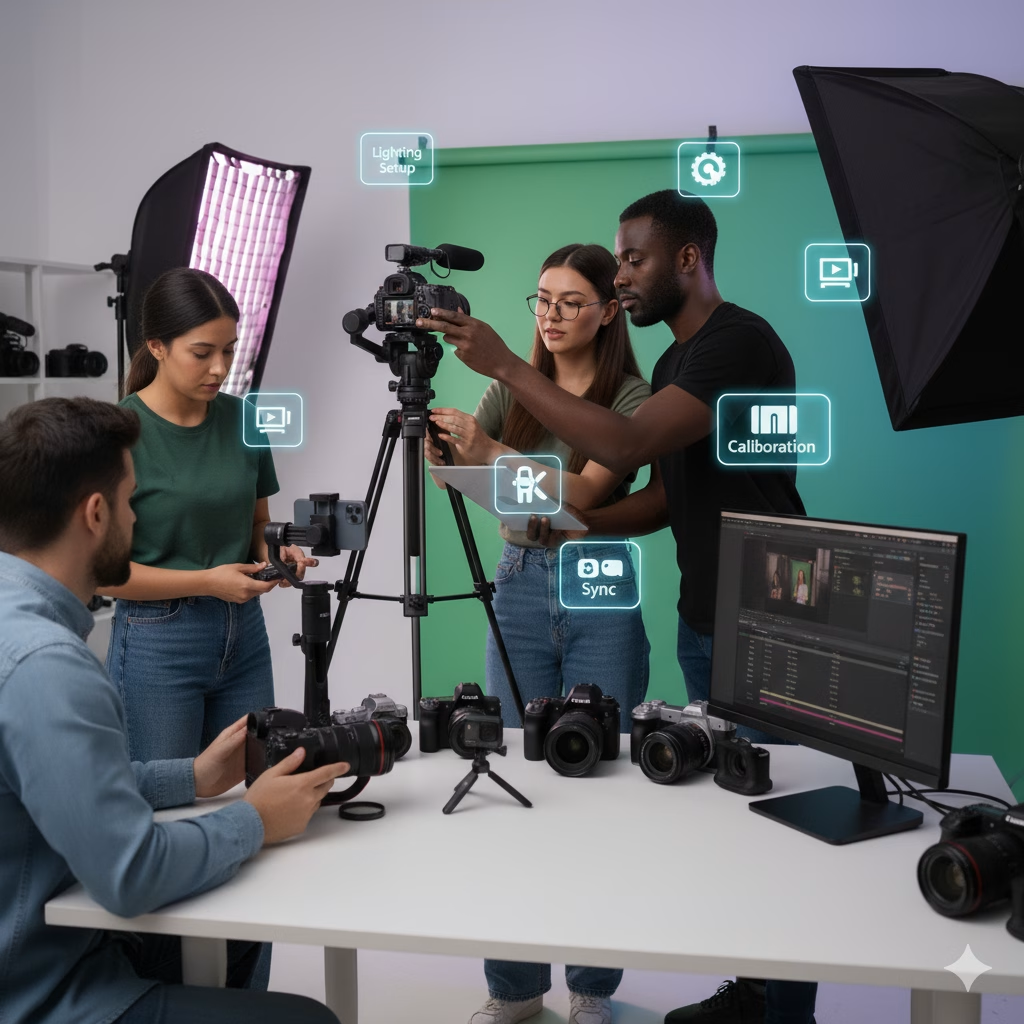
1. Camera Setup for TikTok
Key points for capturing high-quality video:
- Camera Models: Entry-level: Sony ZV-1, Canon M50; Professional: Sony A7 IV, Panasonic GH5.
- Resolution & Frame Rate: 1080×1920 minimum for vertical, 30fps standard, 60fps for motion-heavy content.
- Aperture (f-stop): f/2.8–f/4 for talking heads, f/5.6–f/8 for product shots.
- Shutter Speed: Double your frame rate: 1/60 for 30fps, 1/120 for 60fps.
- ISO: 100–400 indoor with controlled lighting, adjust higher only if necessary.
- White Balance: Lock manually to prevent color shifts: 5600K for daylight, 3200K for warm indoor light.
- Focus: Continuous autofocus (AF-C) with face/eye detection, or pre-focus manually.
- Vertical Orientation: Always film 9:16 aspect ratio for TikTok.
Use a Smartphone: Modern smartphones have excellent cameras that are perfect for TikTok. Use the rear camera for the best quality, as it typically has a higher resolution than the front-facing camera.
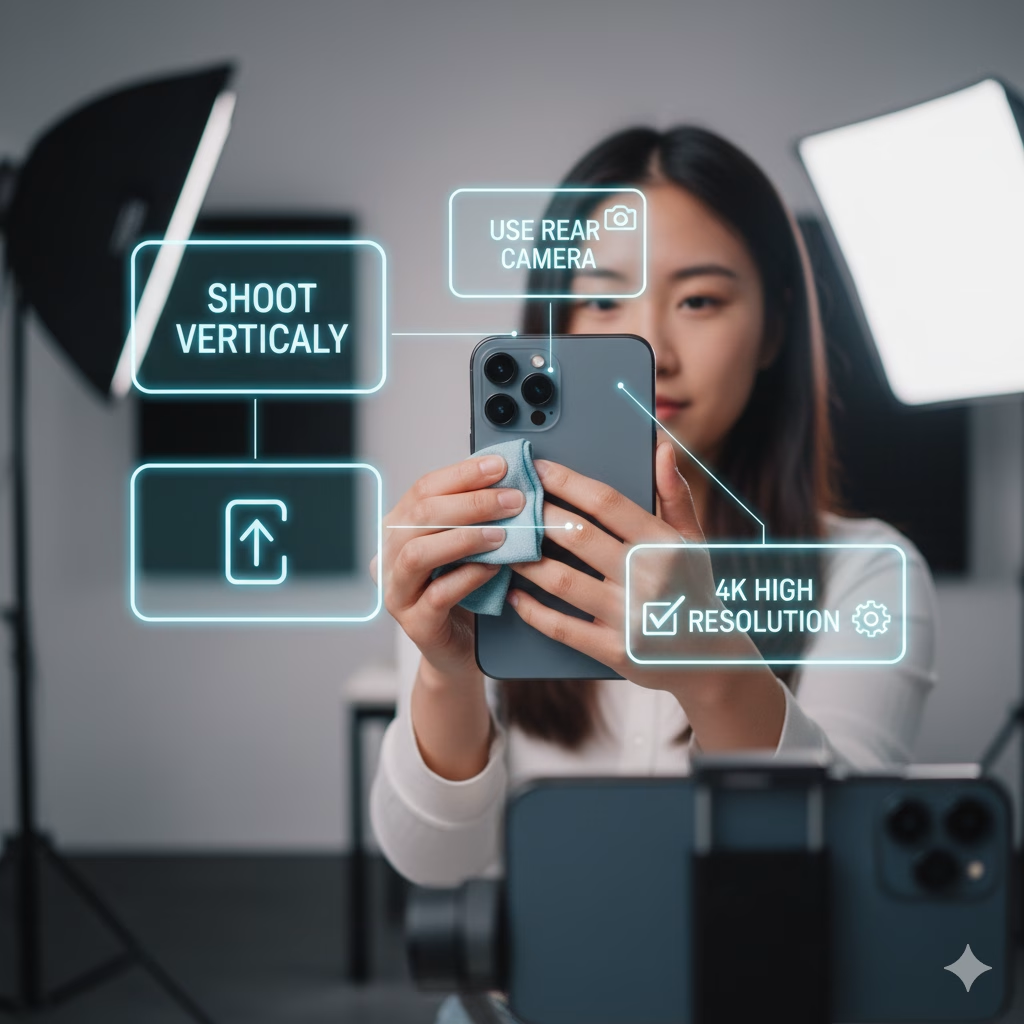
Shoot Vertically: TikTok is designed for vertical content. Always hold your phone in portrait mode to fill the entire screen and provide the best viewing experience.
Clean Your Lens: A simple but crucial step. A smudge on your lens can significantly reduce video quality, so give it a quick wipe before filming.
Shoot in High Resolution: Check your phone’s camera settings to ensure you are recording at the highest possible resolution (e.g., 4K if available) for the sharpest video.
2. Lighting setup for TikTok

Proper lighting is essential for clear, attractive videos:
- Key Light: Main light at 45° angle, slightly above eye level for flattering illumination.
- Fill Light: Softer light to reduce shadows, can be a reflector or secondary softbox.
- Back/Hair Light: Adds depth and separation from background.
- Ring Lights: Beginner-friendly, adjustable brightness and color temperature, 5600K daylight recommended.
- Softboxes & LED Panels: For advanced setups, control light spread and reduce harsh shadows.
- Natural Light: Use window light with diffusion, avoid direct harsh sunlight.
Natural Light is Best: Position yourself facing a window or go outside to take advantage of soft, even natural light. Avoid filming with a bright light source behind you, as this will create a silhouette.
Use a Ring Light: For consistent, professional-looking light, a ring light is a great investment. It eliminates harsh shadows and provides a flattering, even illumination for your face.
Three-Point Lighting: For a more advanced setup, use three light sources: a key light (main light), a fill light (to reduce shadows), and a backlight (to separate you from the background).
3. Audio Setup For TikTok
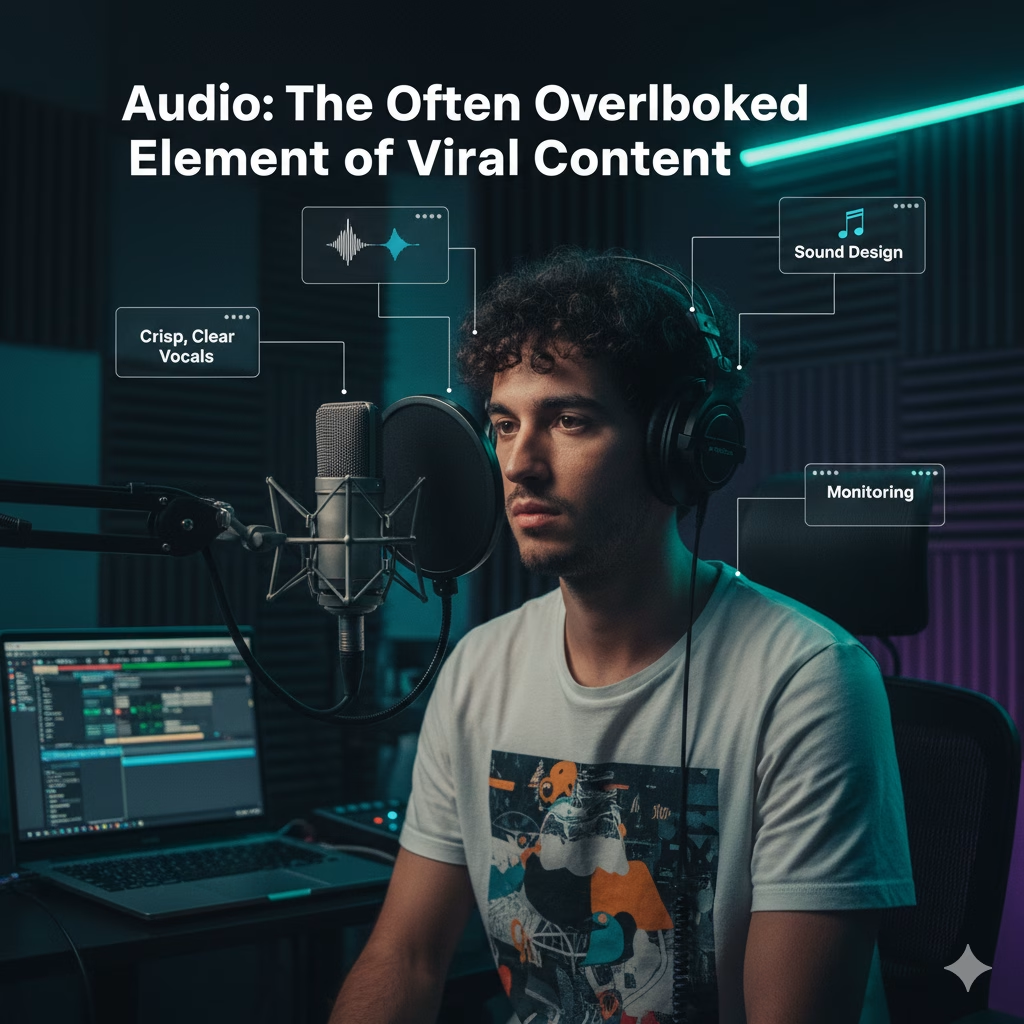
Good audio ensures your content is professional and engaging:
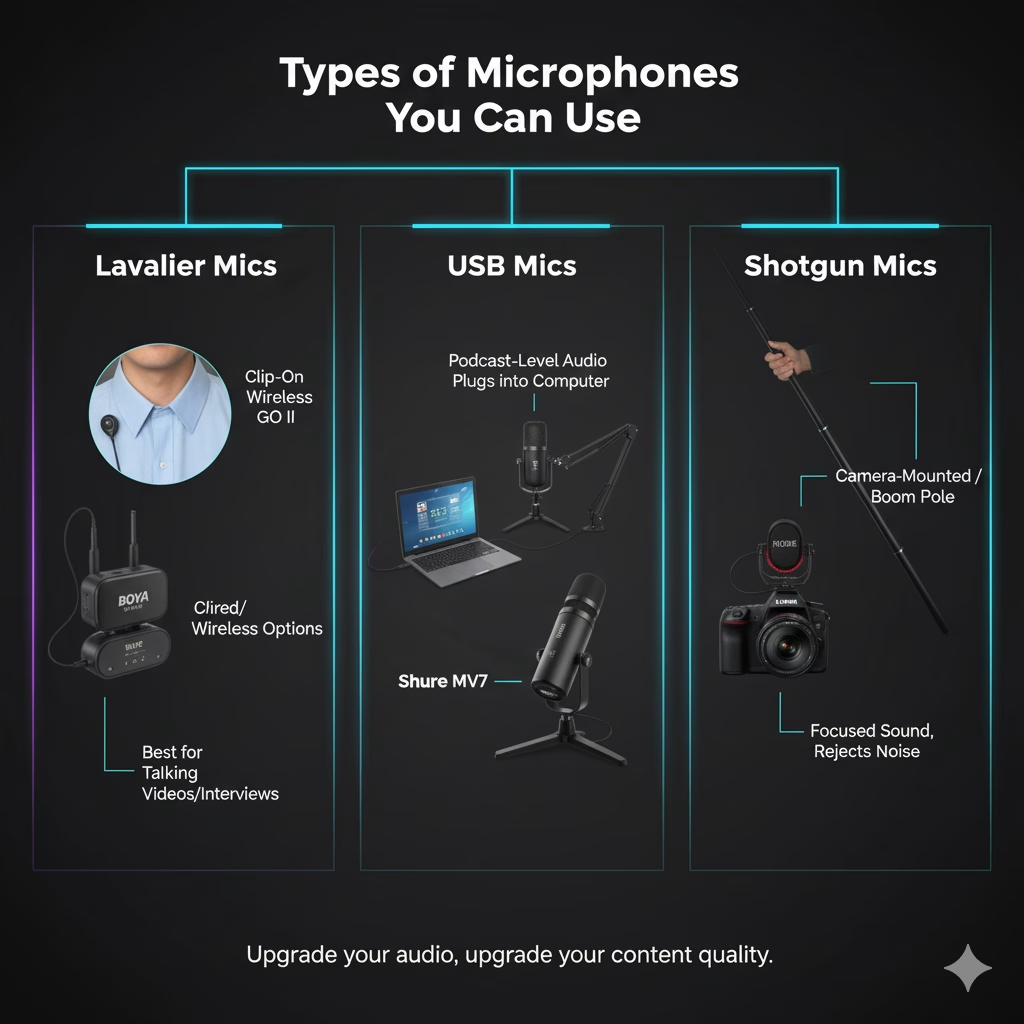
- Microphone Types: Lavalier (Boya BY-M1, Rode Wireless GO II), USB (Blue Yeti, Shure MV7), Shotgun (Rode VideoMic NTG, Deity V-Mic D3 Pro).
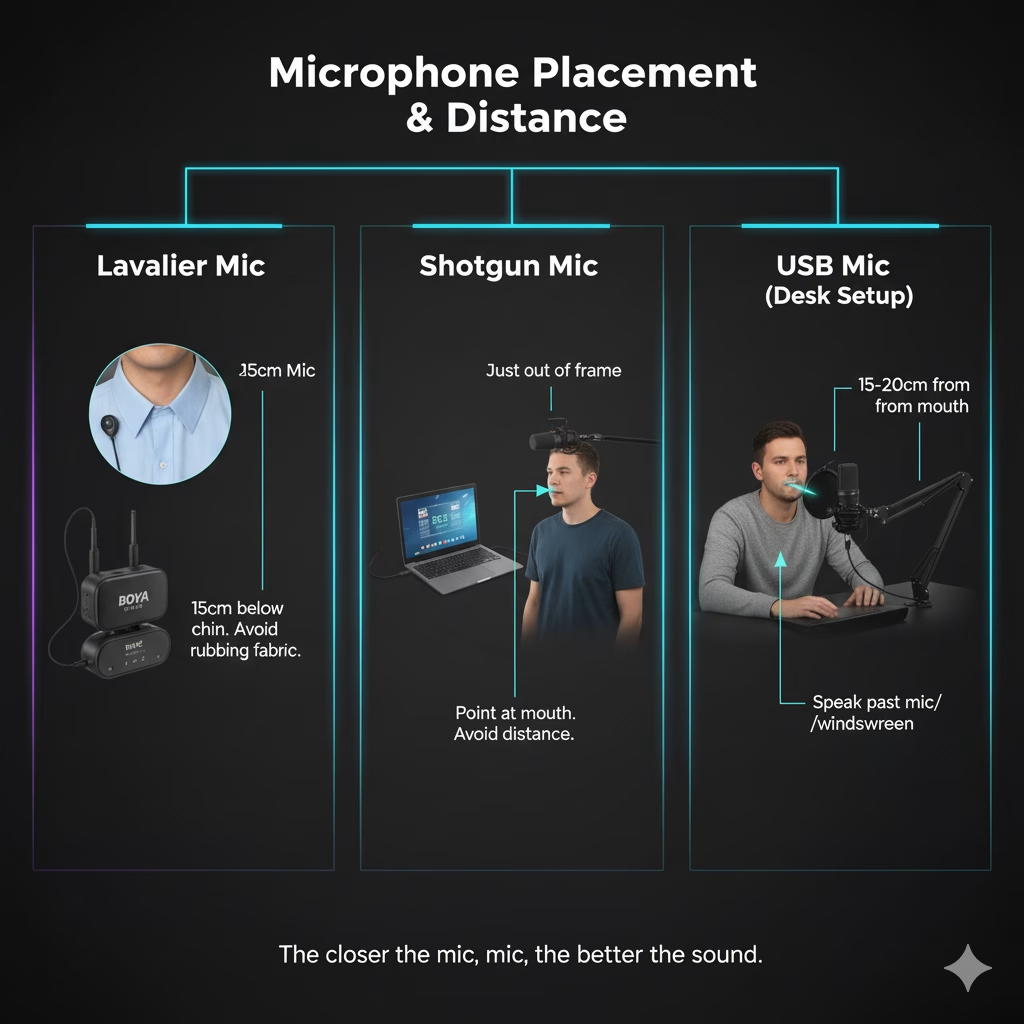
- Placement: Close to mouth, clip-on lavalier 15cm below chin, shotgun just out of frame.
- Background Noise Control: Turn off fans, AC, use foam panels, soft furnishings, or windscreen outdoors.
- Levels: Keep audio peaks around -6dB, never hit 0dB to avoid clipping.
- Synchronization: Align external audio with video in postproduction for clean sound.
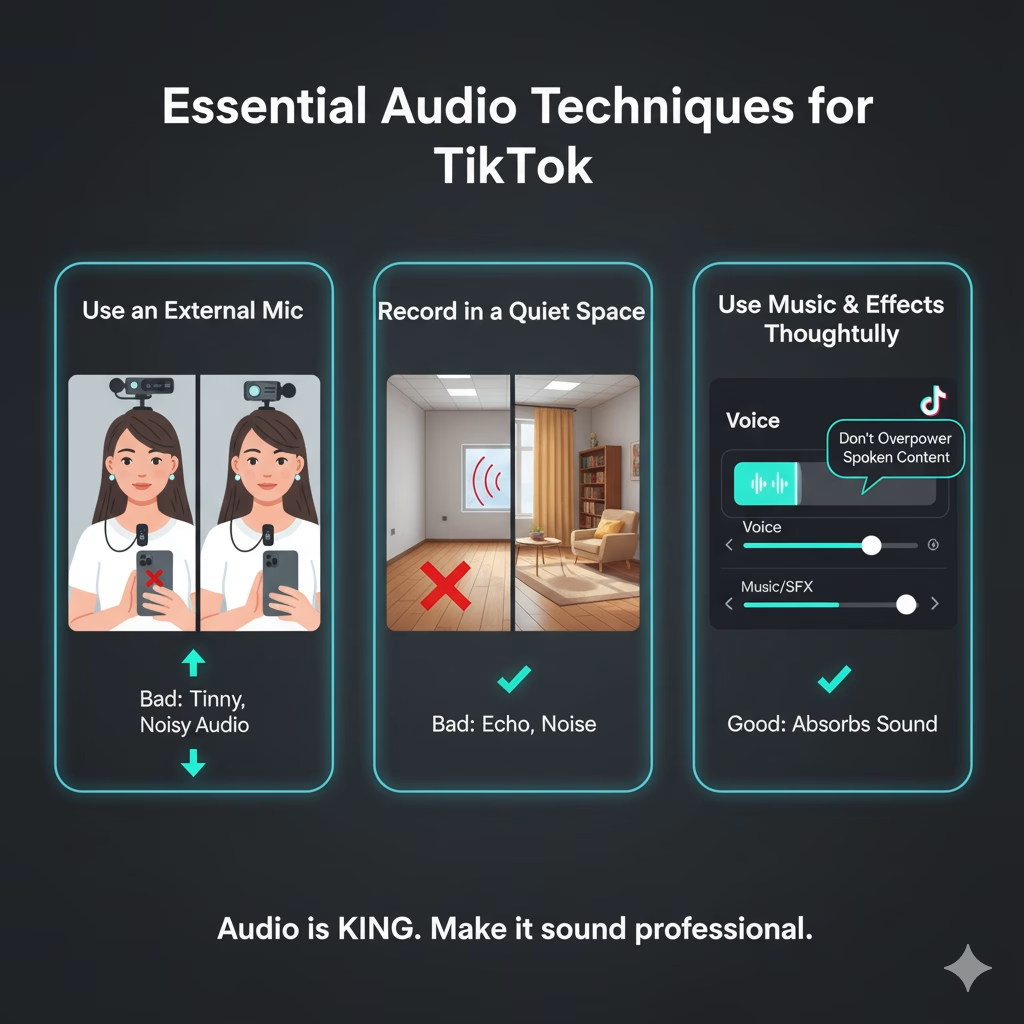
Use an External Mic: Your phone’s built-in microphone can be tinny and pick up background noise. A simple lavalier microphone or a small shotgun mic can dramatically improve audio clarity.
Record in a Quiet Space: Minimize background noise by filming in a room with carpets, curtains, and soft surfaces that absorb sound.
Use Music and Effects Thoughtfully: TikTok’s library of sounds and songs is a core part of the platform. Use trending sounds to increase discoverability, but ensure they don’t overpower your spoken content.
4. Editing and Postproduction
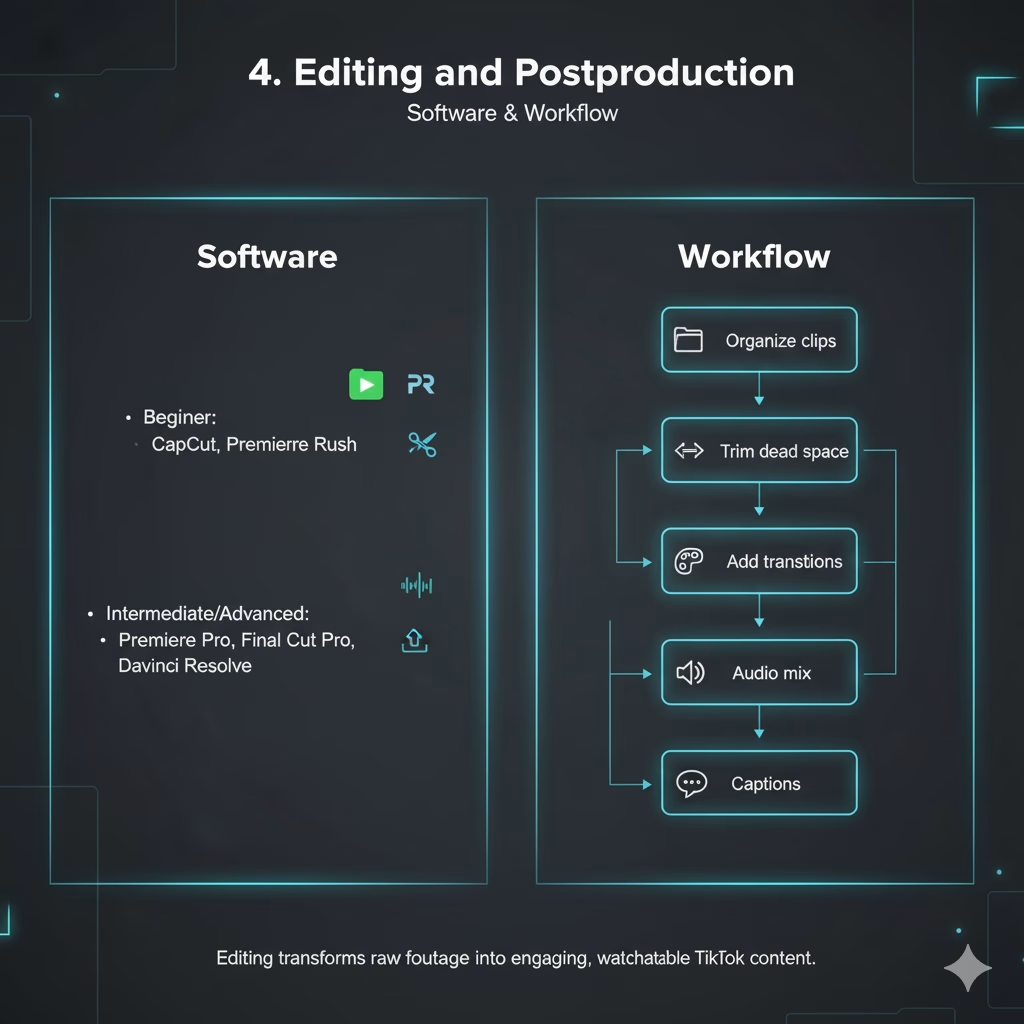
Editing transforms raw footage into engaging, watchable TikTok content:
- Software: Beginner: CapCut, Premiere Rush; Intermediate/Advanced: Premiere Pro, Final Cut Pro, DaVinci Resolve.
- Workflow: Organize clips → Trim dead space → Add transitions → Color grade → Audio mix → Captions → Export.
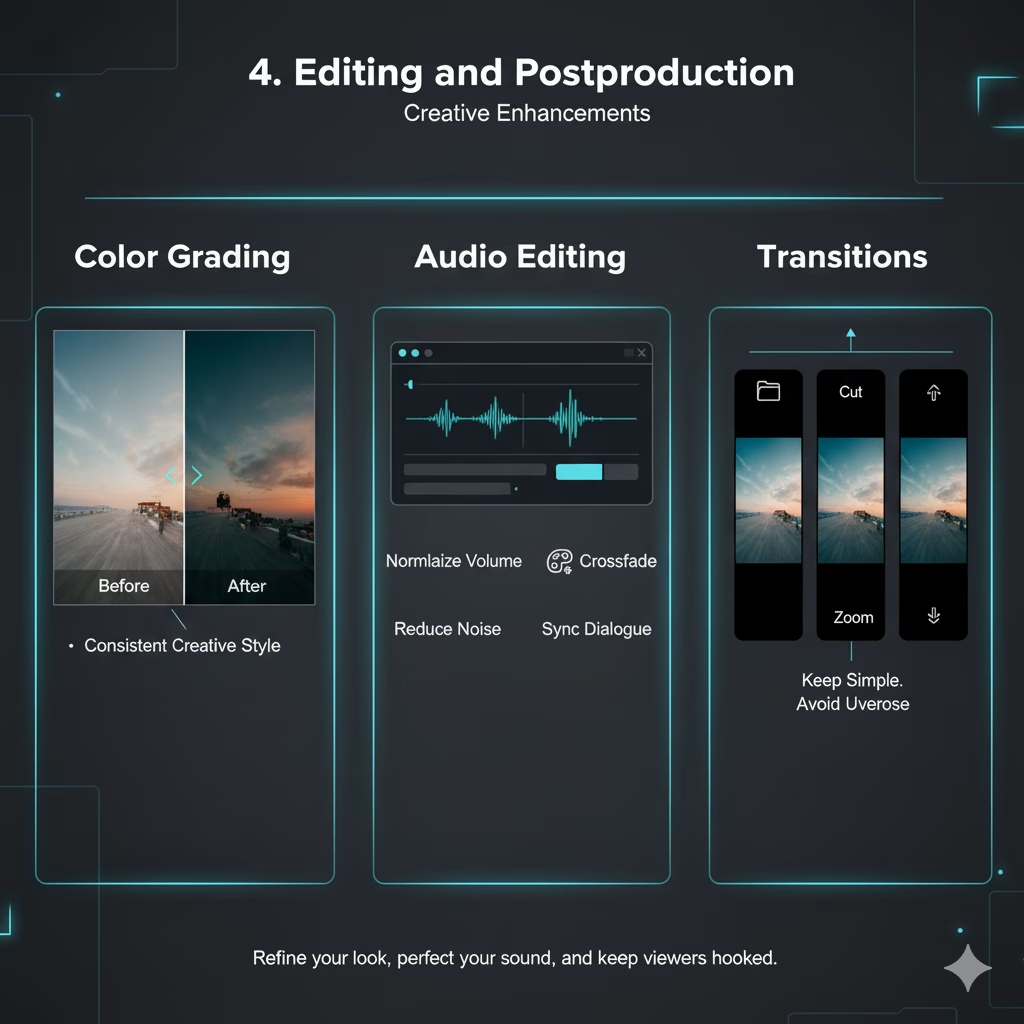
- Color Grading: Correct exposure, contrast, saturation; apply consistent creative style for branding.
- Audio Editing: Normalize volume, reduce noise, sync dialogue/music, add effects as needed.
- Transitions: Keep simple: cuts, crossfades, zooms; avoid overuse of flashy effects.
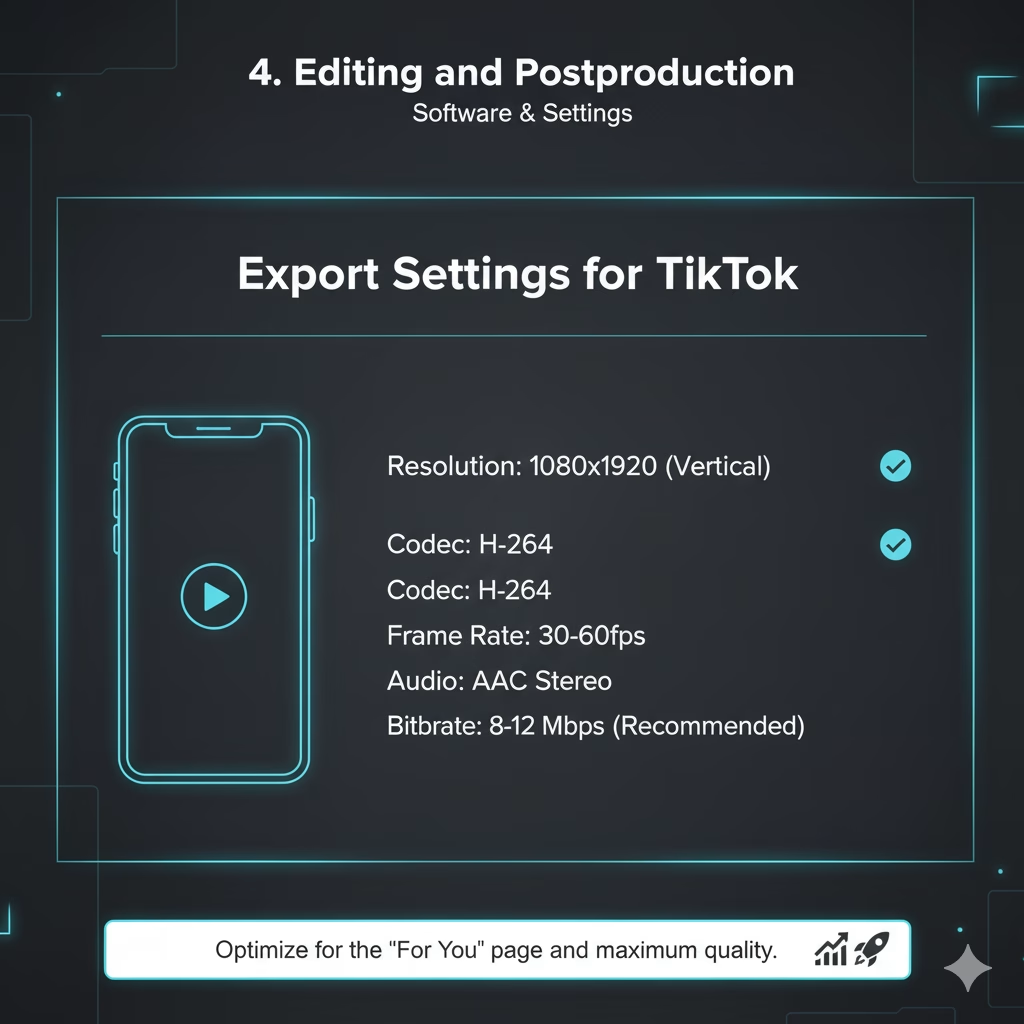
- Export Settings: Vertical 1080×1920, H.264 codec, 30–60fps, AAC stereo audio, 8–12 Mbps bitrate.
Use the In-App Editor: The native TikTok editor is powerful and easy to use. It allows you to quickly trim clips, add text, captions, and effects that are optimized for the platform.
Use External Editors: For more complex edits, consider using professional software like CapCut, Adobe Premiere Rush, or DaVinci Resolve. These offer more control over color grading, transitions, and audio mixing.
Keep it Fast-Paced: TikTok videos are short, so every second counts. Edit for pacing and cut out any dead space to keep viewers engaged.
Add Captions/Subtitles: Many users watch videos with the sound off. Adding on-screen text or captions ensures your content is accessible and understandable to a wider audience.
5. Content Strategy and Engagement
Engagement is critical for TikTok success and monetization:
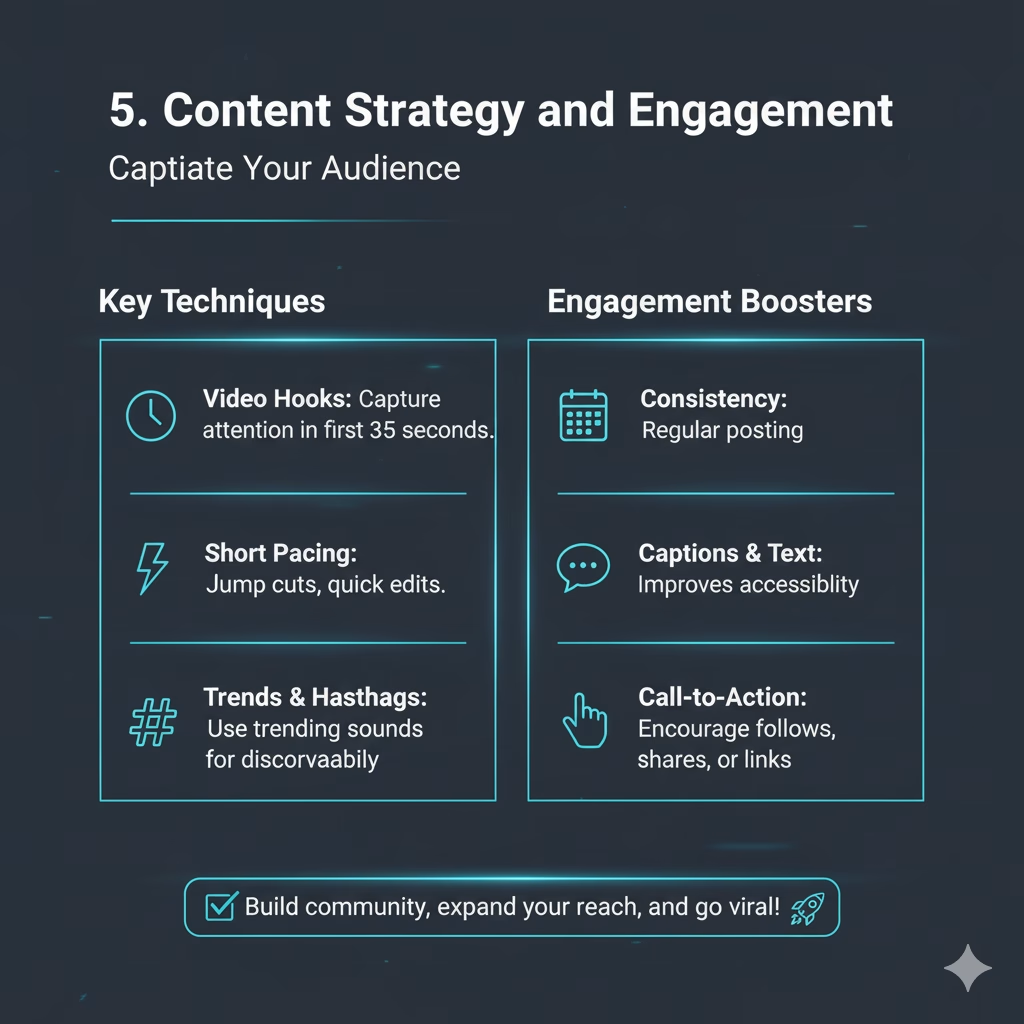
- Video Hooks: Capture attention in first 3–5 seconds.
- Short Pacing: Jump cuts, quick edits, and clear visual storytelling.
- Trends & Hashtags: Participate in challenges, use trending sounds for discoverability.
- Consistency: Regular posting builds algorithmic advantage.
- Captions & Text: Improves accessibility and retention; keep concise and readable.
- Call-to-Action: Encourage follows, shares, comments, or visits to monetized links.

General Content Strategies
Capture Attention Immediately: The first 3-5 seconds are critical. Use a strong hook, a question, or a surprising visual to stop the scroll and keep viewers watching.
Leverage Trends: Keep an eye on the “For You” page to see what sounds, dances, and challenges are trending. Adapting these to your niche is a great way to boost visibility.
Use Relevant Hashtags: Use a mix of broad and niche hashtags to help the algorithm categorize your content and reach your target audience.
Engage with Your Community: Respond to comments and use the “Stitch” or “Duet” features to interact with other creators’ content. Building a community is key to long-term growth.
Have a Clear Call to Action (CTA): Encourage viewers to “follow for more,” “comment your thoughts,” or “check out my other videos” to convert viewers into followers.
6. Monetization Considerations
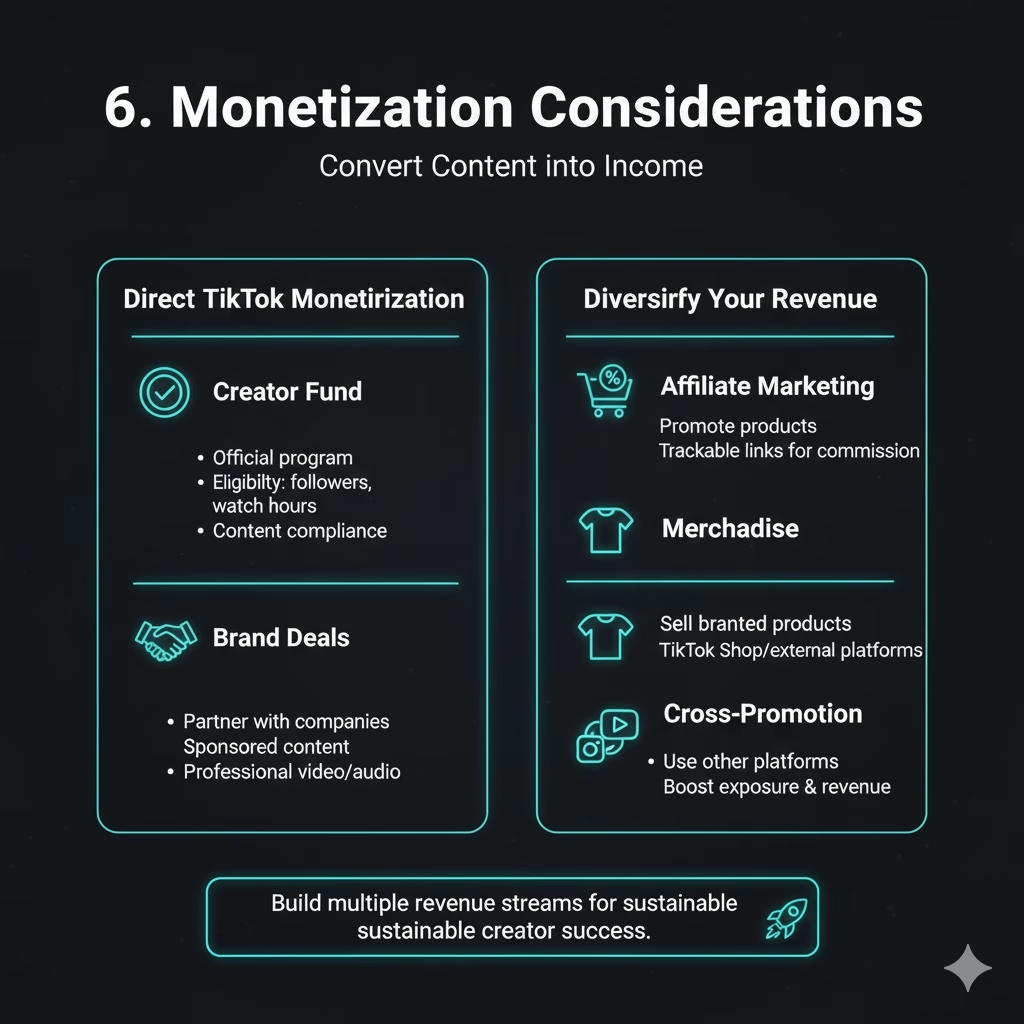
To convert content into income, consider multiple revenue streams:
- Creator Fund: TikTok’s official monetization program; eligibility depends on followers, watch hours, and content compliance.
- Brand Deals: Partner with companies for sponsored content; professional video and audio increase deal potential.
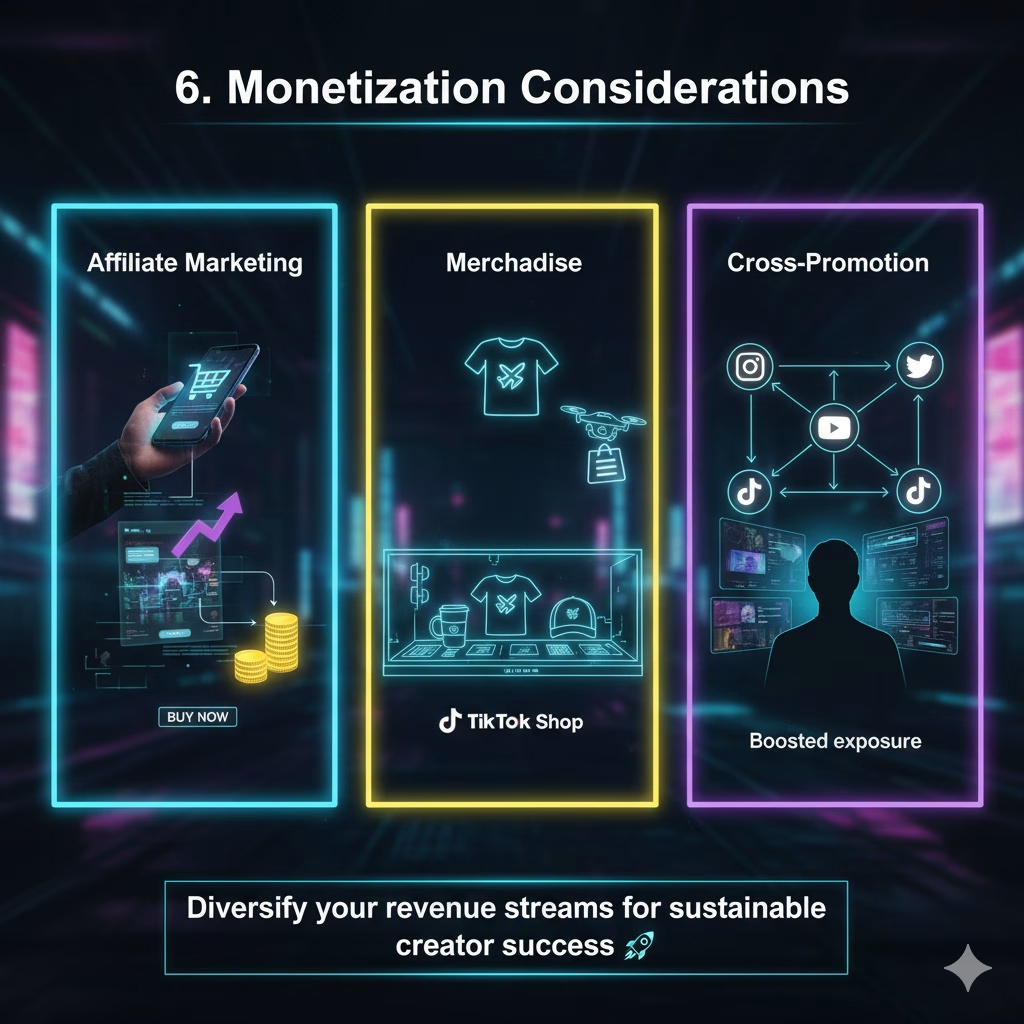
- Affiliate Marketing: Promote products with trackable links for commission.
- Merchandise: Sell branded products to followers using TikTok Shop or external platforms.
- Cross-Promotion: Use Instagram, YouTube, and other platforms to boost exposure and revenue opportunities.
This outline serves as a complete guide to TikTok content creation, from camera and audio setup to editing, engagement strategy, and monetization. Following these steps ensures professional-quality videos optimized for growth and revenue.
In summary, this is what you need to do in order to start making money with TikTok videos:
1. Define target audience
Begin by analyzing who you want to reach, considering demographics like age, gender, and geographic location. Look deeper into psychographics, including interests, daily routines, and emotional triggers that drive content consumption. TikTok’s algorithm favors highly specific niches, so clarity in your audience profile pays off. For instance, a design studio may target small business owners needing websites. Aligning the message with their goals ensures resonance. Without a defined audience, content risks becoming generic and forgettable.
2. Research trending topics
Check TikTok’s “For You” page to identify viral sounds, challenges, and visual styles. Use analytics tools like TrendTok or TikTok Creative Center to verify if trends are rising or declining. Timing is critical, as entering a trend too late reduces exposure. Research also involves monitoring competitors and influencers in your space. Look for opportunities to adapt trends with your unique twist. Staying culturally relevant maximizes visibility and engagement.
3. Brainstorm video concept
Translate audience needs and trending formats into a distinct idea. Concepts should be short, punchy, and easy to execute within TikTok’s time constraints. The first three seconds matter most, so build a hook that surprises, entertains, or educates. A cat knocking over a laptop could humorously introduce a web design service. Balance originality with relatability to encourage shares. Strong concepts save editing time and drive replay value.
4. Write short script
Scripts give structure to what might otherwise become messy improvisation. Even a 15-second clip benefits from clear phrasing and pacing. Limit lines to one idea per sentence to keep the flow digestible. Scripts should also account for on-screen text or captions. For example, a line like “Websites built to grow” can be reinforced visually. With scripting, you ensure the message is not lost in execution.
5. Plan visual shots
Create a shot list detailing camera angles, movements, and props for each segment. Good planning avoids shaky footage or inconsistent lighting. For storytelling, vary between close-ups, medium shots, and wide views. A tech review might need close-ups of buttons or software screens. Think about background colors and set design to reflect your brand identity. Strong visuals increase watch time and encourage follows.
6. Gather necessary props
Prepare everything before recording to avoid interruptions. This includes clothing changes, lighting setups, and any products shown. If using food, tech, or fashion items, ensure they’re camera-ready and neatly arranged. Small details like polished glass or wrinkle-free clothing show professionalism. TikTok viewers subconsciously pick up on polish and preparation. Organized props lead to efficient filming and higher-quality results.
7. Choose background music
Music drives mood and pacing, making it one of the most powerful tools in TikTok videos. Explore the app’s trending sounds, as these tracks often boost algorithmic reach. Match tempo to content fast beats for comedy or challenges, slower tones for storytelling. Make sure the music volume doesn’t overpower dialogue. Pairing music with transitions or text increases memorability. Using licensed in-app tracks avoids copyright issues and guarantees playback.
8. Record raw footage
Film in vertical 9:16 ratio, the native format for TikTok. Always prioritize natural or soft lighting, as poor visuals lower engagement. Record multiple takes to allow flexibility in editing. Use a tripod or stabilizer for smooth shots if movement is involved. Capture extra B-roll footage for transitions or filler moments. High-quality raw footage reduces reliance on heavy editing later.
9. Add text overlays
Text highlights key phrases and makes content accessible for silent viewers. Place text strategically in uncluttered areas of the frame. Sync text with actions or beats for maximum effect. Use concise, bold wording with high contrast for readability. Overlays can emphasize humor, summarize tips, or reinforce brand messaging. Consistent font and style across videos improve brand recognition.
10. Apply visual effects
TikTok’s built-in filters, AR effects, and editing tools provide creative polish. Subtle use of effects makes videos memorable without appearing gimmicky. Align effects with tone: sparkles for playful content, glitch cuts for edgy themes. Experiment with CapCut or third-party tools for professional-grade enhancements. Effects should support the narrative instead of overshadowing it. Properly timed effects can become signature elements of your brand style.
11. Edit transitions smoothly
Transitions keep energy flowing and prevent viewer drop-off. Cut clips to match beats of the soundtrack for rhythm. Use fast cuts for comedy or jump cuts for tutorials. Smooth pacing ensures audiences stay engaged until the end. Apps like CapCut provide drag-and-drop transitions for easy editing. Clean editing separates professional creators from casual uploads.
12. Adjust sound levels
Ensure dialogue is clear and never drowned by music. Normalize audio levels so volume remains consistent throughout. Use noise reduction to cut background hums or clicks. Balance is especially important if layering voiceovers with music. Test audio with headphones to catch subtle flaws. Poor sound quality can tank even the best visuals.
13. Final review playback
Play the edited video multiple times to spot errors in timing or sync. Watch on different devices, since brightness and sound vary by screen. Show a draft to peers for fresh feedback. Fixing issues now saves embarrassment after publishing. Double-check spelling on captions and hashtags for credibility. Perfection in final review makes videos stand out in crowded feeds.
14. Export video file
Render in MP4 format at 1080×1920 resolution for TikTok. Maintain a bitrate of 8–12 Mbps for crisp quality. Keep file size reasonable to upload quickly on mobile networks. Use 30 frames per second for smooth playback. Avoid re-exporting repeatedly, which compresses quality further. Proper export ensures videos look sharp on all devices.
15. Upload with hashtags
Timing the upload matters—post when your audience is most active, often evenings or weekends. Use 5–10 hashtags blending niche tags with broader trending ones. Craft a caption that invites engagement, like a question or call to act. Tag collaborators or use duet/stitched formats for cross-promotion. Enable comments and shares to maximize interaction signals. A strong upload strategy helps the algorithm push your video to more viewers.
Making Money with TikTok: A Complete Guide for Creators
TikTok has evolved from a playful app for lip-syncing videos into one of the most powerful platforms for building influence, cultivating communities, and generating income. For creators who want to move beyond casual posting and start monetizing, it is crucial to understand not only the creative process but also the technical foundations that determine whether content stands out or gets lost in the endless scroll. While luck and virality can still play a role, sustainable TikTok success depends on strategy, high-quality production, and consistent optimization of both the content itself and the tools used to create it. This guide explores every dimension of TikTok monetization from camera and audio setups to editing workflows and revenue streams so that both new creators and seasoned influencers can make informed choices.
1. Choosing the Right Camera for TikTok Content
Unlike platforms that prioritize long-form, cinematic production, TikTok thrives on short, vertical, mobile-first videos. That said, creators who want to move beyond average quality should invest in cameras that balance portability, resolution, and smooth autofocus. Smartphones remain the entry point, with models like the iPhone 17 Pro/Max and Samsung Galaxy S26 Ultra offering superior native video capture with 4K resolution, strong dynamic range, and reliable optical image stabilization. However, dedicated cameras bring an edge for creators targeting sponsorships or building a professional brand. The Sony ZV-1 is often recommended as a compact option tailored for content creators with a flip-out screen and real-time eye autofocus. For those seeking interchangeable lenses, the Sony A7 IV or Canon EOS R10 provide outstanding performance in 4K recording, strong low-light capabilities, and the flexibility to switch lenses for different shooting environments. These tools ensure that creators do not lose potential viewers because of shaky footage or poor detail, which subconsciously signals lower effort. TikTok’s algorithm favors engagement, and higher production quality contributes directly to better retention. A thorough review of creator-friendly cameras can be found on DPReview.
Camera Setup and Shooting Workflow
Once the equipment is chosen, creators must optimize camera settings and shooting workflows to maximize TikTok performance. Videos should always be shot in vertical 9:16 format, ideally in 1080×1920 or higher resolution, to match TikTok’s preferred specifications. Frame rates between 24fps and 30fps work for cinematic or lifestyle content, while 60fps can be used for smooth motion, fitness tutorials, and fast-paced demonstrations. For smartphone users, investing in a gimbal stabilizer such as the DJI Osmo Mobile 6 ensures fluid camera movements and prevents jitter, which can distract viewers. Creators using dedicated cameras should utilize tripods like the Manfrotto Befree Advanced or Joby GorillaPod for stable positioning. Consistency in background aesthetics also matters minimalist setups, clean backdrops, or intentional props enhance professionalism. Background clutter decreases focus and makes videos less shareable. Finally, audio monitoring via headphones prevents technical mistakes like distorted sound or accidental silence. More on optimizing shooting workflows can be found at TikTok Creator Resources.
- Detailed Camera Setup Guide for TikTok Content (Explained Step by Step)

Many creators buy expensive cameras and lights, then end up with videos that look worse than what an average phone can produce. The problem is not the equipment, but the setup. TikTok is a vertical video platform, which means your camera needs to be configured specifically for this format. Let us start from the basics and break down every single parameter, so even someone with zero photography knowledge can follow along. Think of the camera as a box that controls three things: how much light comes in (aperture, written as f-stop), how long light is allowed to hit the sensor (shutter speed, written as fractions like 1/60), and how sensitive the sensor is to that light (ISO, written as numbers like 100, 800, 3200). These three together are called the “exposure triangle” and they must always stay balanced.
Aperture (f-stop): On most cameras you will see numbers like f/1.8, f/2.8, f/4, f/8. This controls how wide the lens opens. A smaller number like f/1.8 means the lens is very open, letting in a lot of light and blurring the background (this is what gives that “cinematic” look). A bigger number like f/8 means less light and more of the scene in focus (background sharper). For TikTok, if you are filming yourself talking or doing lifestyle content, use something between f/2.8 and f/4. This keeps your face sharp but still slightly separates you from the background. If you shoot product showcases, you can go higher like f/5.6 to keep the object and hands fully in focus.
Shutter Speed (frames per second sync): Shutter speed must match your video frame rate. TikTok videos are best shot at either 30fps or 60fps. The rule is simple: your shutter speed should be roughly double your frame rate. So if you shoot 30fps, use 1/60 shutter speed. If you shoot 60fps, use 1/120 shutter speed. This prevents motion from looking jittery or “ghosting.” Never set shutter too high unless you want a stuttery effect (common in action sequences but not flattering for talking head videos). Keep in mind, slower shutter lets in more light, faster shutter cuts light, so you will adjust ISO or aperture accordingly.
ISO (sensor sensitivity): ISO should always be as low as possible for clean video. On most cameras, ISO 100–400 is clean, ISO 800–1600 is still acceptable, and ISO 3200+ introduces noise (grain). TikTok compresses video heavily, so noise looks even worse on the app. Use good lighting to keep ISO low. For example, indoors with a ring light at your desk, set ISO around 200–400. Outdoors during the day, ISO 100 is perfect. If you are filming at night, use more lighting rather than pushing ISO too high, unless you have a camera with strong low-light performance like Sony A7 series.
Frame Rate and Resolution: Always shoot vertical (9:16 aspect ratio). Resolution should be 1080×1920 minimum, though many cameras allow 4K vertical recording which looks sharper even after TikTok compresses it. Frame rate depends on the type of video. Talking head, tutorials, and casual lifestyle → 30fps is standard. Dance, sports, or high-motion content → 60fps for smooth movement. Avoid mixing frame rates across clips unless you know how to edit properly. TikTok supports both, but your editing workflow should match the chosen fps.
White Balance: Do not use auto white balance, because it shifts colors mid-video and looks unprofessional. Set white balance manually depending on light source. For daylight, use 5600K. For warm indoor bulbs, use 3200K. Many ring lights and LED panels let you adjust color temperature, so match your camera setting to your light. This ensures skin tones stay consistent and avoids the awkward orange/blue color shifts common in beginner videos.
Focus Settings: Use continuous autofocus (AF-C) with face/eye detection if your camera supports it. This keeps your face sharp even if you move slightly. If your camera lacks reliable AF, manually pre-focus by standing where you will be, focusing on your eyes, then locking focus. Never let the camera hunt focus during recording it ruins the video.
Example Setup (Beginner with Sony ZV-1 + Ring Light): Set resolution to 1080×1920, frame rate 30fps, shutter speed 1/60, aperture f/2.8, ISO around 200 with ring light at medium brightness, white balance at 5600K (if light matches daylight color). Place camera on tripod at eye level, about 1 meter away. Ring light directly behind camera, slightly above eye level angled down. This creates flattering light, avoids shadows under the chin, and keeps your face sharp.
Example Setup (Advanced with Sony A7 IV + Softbox Lighting): Resolution 4K vertical, 30fps, shutter 1/60, aperture f/2.8 with 35mm lens, ISO 100–400 depending on brightness. Two softboxes at 45° angles left and right, one slightly stronger for key light. White balance locked at 5600K. Rode Wireless GO II microphone clipped to shirt. Tripod placed 1.5m away to give slight background separation. This setup creates cinematic TikToks that stand out immediately in feed.
For more detailed explanations of video settings, check DPReview Learning Center and Wemaxa for strategy-focused tutorials that combine technical setup with monetization insights.
2. Lighting Setup: The Silent Factor Behind Viral Videos
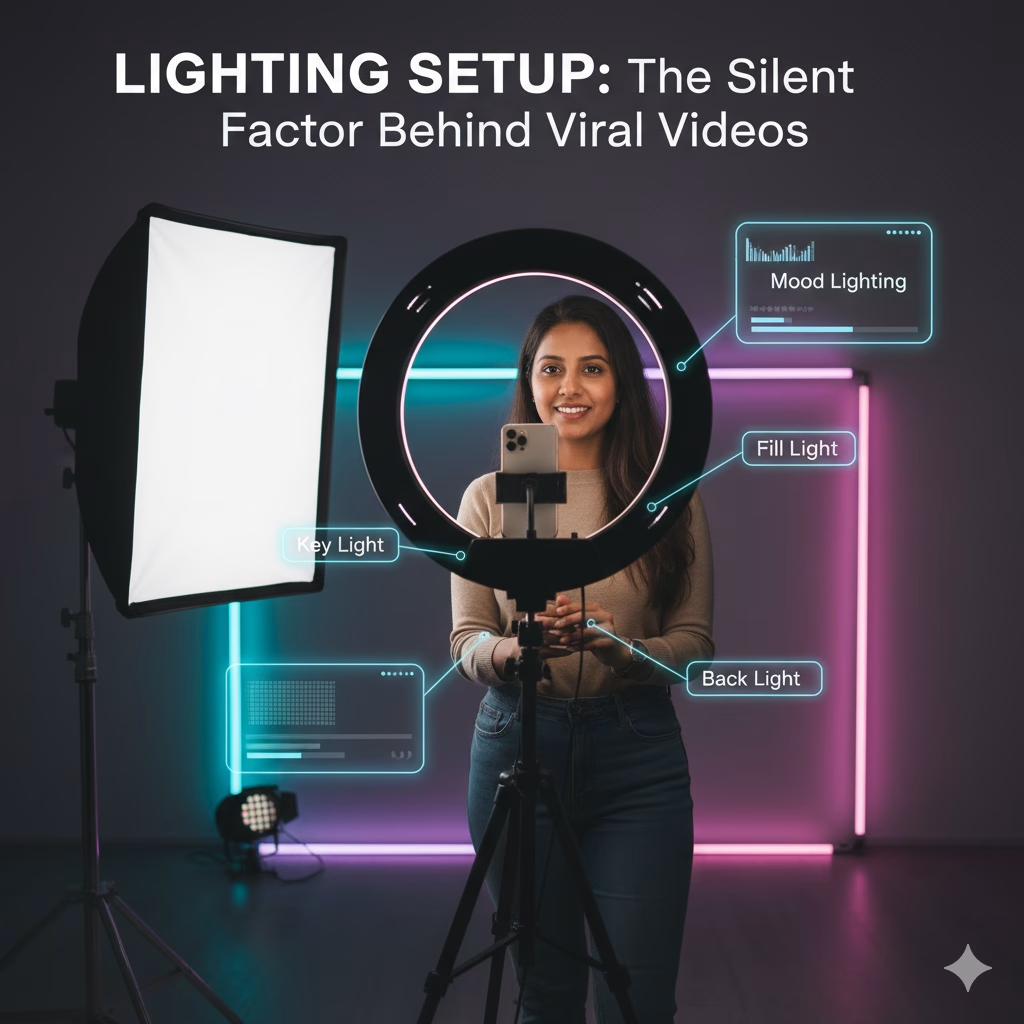
No matter how advanced the camera, bad lighting makes videos look dull, flat, or unprofessional. TikTok creators often underestimate how much good lighting improves the overall appeal of their content. Natural light from a large window works well for daytime shoots, but for consistency and flexibility, dedicated lighting gear is essential. The most common entry point is a ring light, such as the Neewer 18-inch LED Ring Light Kit, which provides soft, even illumination ideal for beauty, lifestyle, and educational videos. For more control, softbox lights like the Godox SL-60W with diffusion panels create cinematic shadows and depth, suitable for storytelling and professional-style skits. For portable setups, LED panel lights like the Aputure Amaran 100d or the Lume Cube Panel Pro allow creators to shoot in variable environments, adjusting color temperature to match ambient light. Proper lighting ensures that skin tones look natural, products appear appealing, and video quality remains high even when compressed by TikTok’s upload algorithms. Additional lighting resources can be explored at B&H Photo, where creators can compare lighting kits tailored to content creation.
Detailed Lighting Setup for TikTok Creators (Step by Step Guide):
Lighting is the difference between looking like a professional creator or looking like someone recording in a basement. The camera can only capture what the light allows it to see. Without enough light, your video looks grainy, flat, and cheap. With the right setup, even a cheap camera looks professional. The good news: you don’t need a Hollywood studio, just a basic understanding of how light works. We will break it down like teaching a beginner from scratch, so you can copy and paste these steps into your recording routine without overthinking.
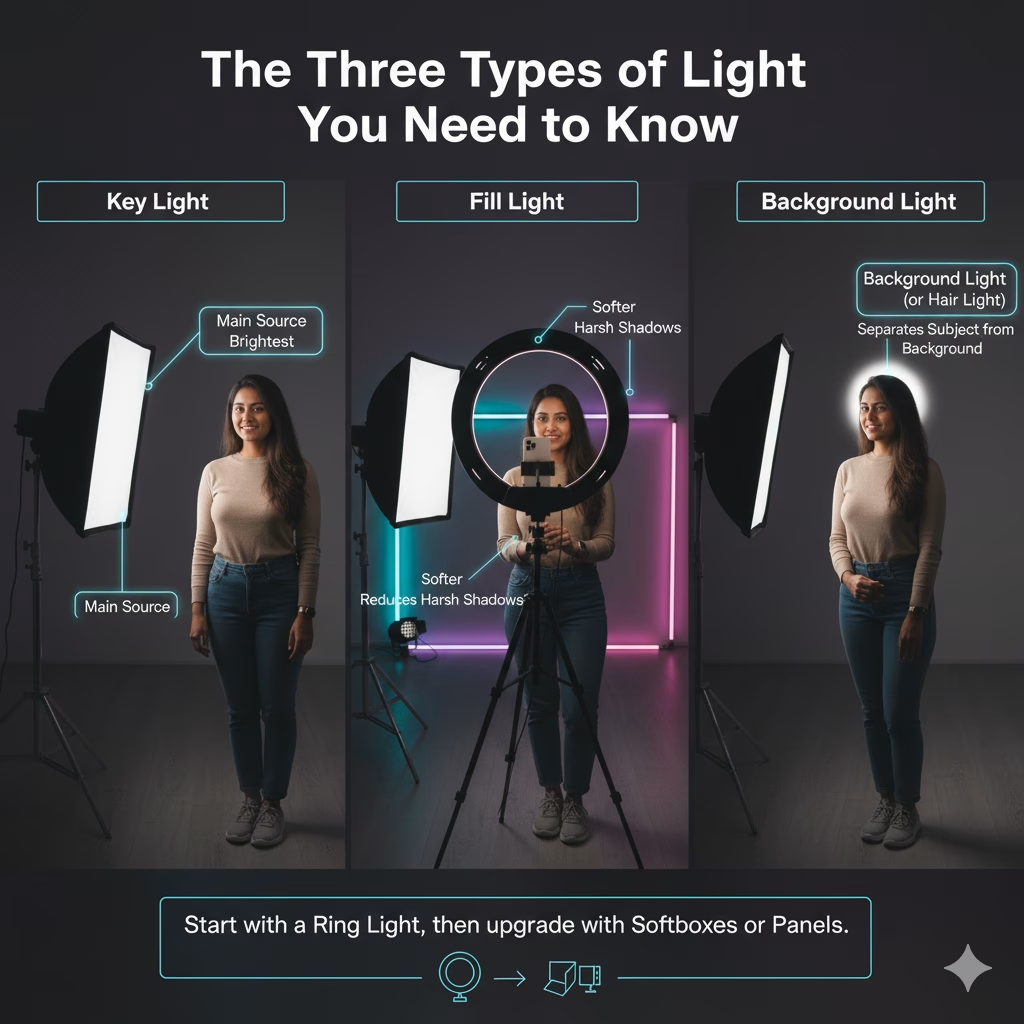
The Three Types of Light You Need to Know: First, the key light is your main source. This should be the brightest and the one that defines your face. Second, the fill light is softer and reduces harsh shadows on the other side of your face. Third, the background light (or hair light) separates you from the background so you don’t look like a flat cardboard cutout. Even if you cannot afford all three, at least get the key light right. Most creators start with just one ring light, then upgrade by adding softboxes or panels to refine the look.
Ring Light Setup (Beginner): Place the ring light directly behind the camera, centered with your face. Height should be slightly above your eyes and angled down just a bit this prevents the horror-movie shadow under your chin. Brightness should be adjusted so your face looks evenly lit without blowing out highlights (overexposed skin looks like a glowing white patch). If your ring light has color temperature control, set it to around 5600K for daylight look or 4500K for a warmer, cozy feel. Distance matters: keep the ring light about 1 meter away. Too close makes your skin oily-looking, too far makes the light weak and ineffective. A simple Neewer 18” ring light is enough for a polished TikTok setup.
Softbox Lighting Setup (Intermediate): Softboxes create diffused, soft light that wraps around your face naturally. Place the main softbox (key light) at about 45° angle to your face, slightly above eye level, pointing down. On the opposite side, add a second softbox or LED panel at lower brightness to act as fill light. This prevents one side of your face from being too dark. If you only have one softbox, use a reflector or even a white wall to bounce light back onto the darker side of your face. Keep the lights at equal height, about 1.5m away, so the light spreads evenly without creating harsh shadows. A budget option is the Godox SL-60W with a softbox attachment, a favorite among YouTubers and TikTokers.
Background and Hair Lighting (Advanced): Once you master key and fill lights, add separation. A small LED panel behind you, aimed at the wall, creates a glowing background effect that makes your space feel intentional. If you want cinematic vibes, use RGB panels like the Aputure Amaran MC or Nanlite PavoTube to splash color behind you (blue and purple are common). For a clean professional look, use a hair light a small light aimed at the top of your head and shoulders from behind. This creates a rim of light that outlines you, preventing you from blending into the background. Even a cheap clamp light can work if angled correctly. This setup is what makes your TikTok videos look like professional ads instead of casual clips.
Lighting Mistakes to Avoid: Do not put the light directly above your head it creates dark circles under your eyes. Do not mix light sources of different colors (like a yellow lamp and a daylight LED) unless you want a strange blue/orange skin tone. Do not use only overhead room light; it makes your face look flat and unflattering. Always check how your face looks on camera before recording, because what feels bright to your eyes may look too dark for the lens. If in doubt, brighten more and lower ISO on the camera to keep noise low.
Example Setup (TikTok Beauty Creator): One ring light in front at 5600K, softbox to the side at 45°, RGB LED panel behind set to soft purple glow, hair light angled at head from above and behind. Result: face evenly lit, background has color pop, hair separated from background. Even with an iPhone, this setup looks professional and drives engagement.
Example Setup (Educational TikTok): One key softbox at 45°, white reflector opposite side, clean white wall behind with a background LED panel set to blue. This ensures the focus stays on the speaker, not distracting background clutter. Audio clarity combined with this setup builds authority and trust quickly.
3. Audio: The Often Overlooked Element of Viral Content
Viewers may tolerate slightly imperfect video quality, but poor audio is a deal-breaker. Audio determines clarity, professionalism, and ultimately trust. TikTok creators have multiple options depending on budget and workflow. For mobile shooting, the Rode VideoMic Me-L (for iPhone) or Rode VideoMic Me-C (for USB-C Android devices) provide directional sound capture that reduces background noise. Lavalier microphones such as the Rode Lavalier GO or the Sennheiser XSW-D Portable Lavalier System offer discreet and high-quality sound, perfect for interviews, commentary, and tutorials. For desktop creators working with voiceovers, podcast-style audio, or streaming, the Shure MV7 and Blue Yeti remain industry standards. These microphones ensure warmth, depth, and clarity, which are especially important when creators repurpose TikTok clips for YouTube Shorts or Instagram Reels. For a more advanced wireless setup, creators can look at the Rode Wireless GO II, a compact yet powerful system that allows mobility while maintaining strong audio capture. Guides on creator audio setups can be found at RTINGS Microphone Reviews, which provide technical breakdowns for various recording needs.
Detailed Audio Setup for TikTok Creators (Step by Step Guide)
If your video looks amazing but sounds terrible, people will scroll away instantly. TikTok compresses video heavily, but it does not forgive bad audio. Clear, consistent sound makes your content feel professional and trustworthy. Beginners often underestimate this and record with the phone’s built-in microphone, which picks up room echo, air conditioning, and background noise. To fix this, you need the right microphone, correct placement, and basic control over your environment. Let us go through this in plain language, step by step.
Types of Microphones You Can Use: The simplest upgrade from built-in phone mics is a clip-on lavalier microphone. Cheap wired options like the Boya BY-M1 work fine, while premium wireless systems like the Rode Wireless GO II allow you to move around without being tied to a cable. Lavalier mics are best for talking videos, interviews, or tutorials because they sit close to your mouth and capture clean sound. For creators filming at a desk or streaming, USB microphones like the Blue Yeti or Shure MV7 provide podcast-level audio and plug directly into a computer. If you need something more flexible and professional, shotgun microphones like the Rode VideoMic NTG or Deity V-Mic D3 Pro can be mounted on the camera or boom pole to capture focused sound while rejecting noise from the sides.
Placement and Distance: The golden rule of audio is simple: the closer the mic is to your mouth, the better the sound. If you use a lavalier mic, clip it to your shirt about 15cm below your chin. Make sure it is not rubbing against fabric, jewelry, or hair. If you use a shotgun mic, place it just out of the camera frame, pointing directly at your mouth. Do not put it too far away every extra 30cm increases room echo and background noise. For USB microphones at a desk, place the mic about 15–20cm from your mouth, slightly off to the side, and speak past it, not directly into it, to avoid breath pops. Use a pop filter or foam windscreen to soften harsh consonants like “P” and “B.”
Background Noise Control: Even the best microphone cannot fix a noisy room. Before recording, turn off fans, AC units, and loud electronics. If your room echoes, use soft materials to absorb sound: curtains, rugs, even hanging blankets on walls. Small foam panels (cheap on Amazon) can reduce echo further. If you film outside, always use a windscreen (the furry cover often called a “dead cat”) to block wind noise. Without it, even a small breeze makes your audio unusable. Remember: viewers forgive a little background hum, but not wind distortion or muffled voices.
Camera and Phone Connections: Lavalier and shotgun mics often connect using 3.5mm jacks. If your phone does not have a headphone jack, you will need a lightning-to-3.5mm adapter (iPhone) or USB-C-to-3.5mm adapter (Android). Some microphones like the Rode Wireless GO II or Shure MV88+ connect via USB-C or Lightning directly. For cameras, plug into the mic input (usually labeled “MIC IN”). Always check audio levels on the camera screen before recording. The audio meter should peak around -6 dB but never hit 0 dB (that causes clipping, which sounds distorted and cannot be fixed later).
Example Setup (Beginner on Smartphone): Clip a Boya BY-M1 lavalier to your shirt, plug into phone with adapter if needed. Set phone on tripod, place ring light behind it, and record. Cost: under $30, huge upgrade from built-in mic. Result: clear voice, reduced background noise, better engagement.
Example Setup (Intermediate Creator on Camera): Use Rode VideoMic NTG on top of Sony ZV-1. Place mic about 1 meter away, pointed directly at speaker. Add foam windscreen indoors or furry windscreen outdoors. Check levels on camera, keep peaks below 0 dB. Result: directional sound that rejects room echo and focuses on your voice. Ideal for skits, lifestyle, or vlogging.
Example Setup (Advanced Home Studio): USB Shure MV7 connected to laptop via USB-C, placed on boom arm 20cm from mouth with pop filter. Two softboxes for lighting, DSLR recording video. Record audio separately in software like Audacity or Adobe Audition, then sync in editing. Result: podcast-quality voice, cinematic video, professional enough for brand sponsorships.
For detailed microphone reviews and comparisons, visit RTINGS Microphone Guide. For strategic tips on combining audio quality with content monetization, explore Wemaxa, which covers how production values influence brand deals and creator earnings.
3. Editing and Postproduction for TikTok Creators
Editing is where your TikTok videos go from raw footage to content that can grab attention, increase watch time, and drive monetization. Even perfectly shot video can fail if the editing is sloppy. The postproduction stage involves organizing clips, trimming, adding transitions, color correction, sound design, captions, and exporting in formats optimized for TikTok. For creators aiming to earn money, editing is as important as shooting because TikTok’s algorithm rewards engagement, retention, and watch time all of which can be enhanced through clean, well-paced edits.
Choosing Editing Software: There are multiple levels of software depending on your skill and budget. Beginners can start with Adobe Premiere Rush or CapCut, both of which are user-friendly, support vertical 9:16 video, and provide basic transitions, text overlays, and audio adjustment. Intermediate and advanced creators can use Adobe Premiere Pro, Final Cut Pro X, or DaVinci Resolve, which allow full control over color grading, multi-track audio, keyframing, speed ramps, and motion graphics. TikTok’s mobile editor is sufficient for very short content, but for monetized channels or sponsorship-ready videos, desktop software ensures higher quality and more consistent results.
Workflow Step 1: Organize Your Footage: Always start by importing your clips and arranging them in chronological order. Rename files for easy reference. On multi-camera shoots, synchronize clips with audio tracks. Create bins or folders for raw footage, audio files, graphics, and exported videos. Organization at this stage saves hours in postproduction and prevents mistakes such as using the wrong clip or audio version.
Workflow Step 2: Trimming and Sequencing: TikTok videos thrive on fast pacing. Begin by trimming unnecessary frames, dead space, or mistakes. Cut clips tightly to maintain viewer attention, aiming for the first 3–5 seconds to capture interest. Use jump cuts strategically for dialogue, reactions, or tutorial steps. If your video is longer than 60 seconds, consider breaking it into multiple parts to increase retention. Keep sequences logical storytelling even in short clips matters. On desktop software, use ripple edits and keyboard shortcuts to accelerate this process. On mobile editors like CapCut, use split and trim tools for precise cuts.
Workflow Step 3: Transitions and Effects: Overuse of flashy transitions can look amateurish. Stick to simple cuts, crossfades, and short zooms for emphasis. For advanced creators, speed ramps, motion blur, and scale transitions can add polish. TikTok supports in-app effects like shake, glitch, and color overlays, but combining them with professional software allows you to control timing and intensity. Always preview your edits in vertical 9:16 aspect ratio, as horizontal previews can mislead you about how effects appear on mobile screens.
Workflow Step 4: Color Grading and Correction: Even videos shot with perfect exposure may look flat on phone screens. Color correction adjusts exposure, contrast, white balance, and saturation to achieve consistent skin tones and overall aesthetic. Start by correcting clips to neutral settings, then apply a creative grade for branding consistency. For example, a fitness channel may use bright, punchy tones; a luxury lifestyle channel may desaturate slightly and increase contrast. Tools like DaVinci Resolve excel at this, while Premiere Pro offers Lumetri Color panels for precise adjustments. Always check clips on multiple devices (phone, tablet, desktop) to ensure your grading works across screens.
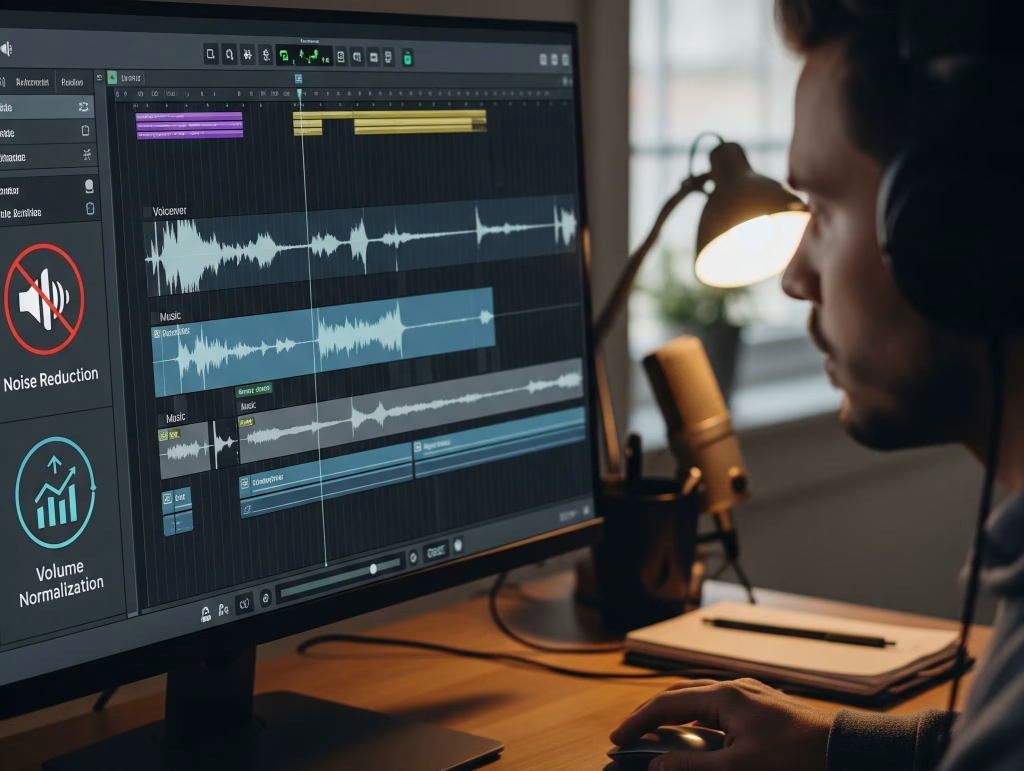
Workflow Step 5: Audio Editing and Sound Design: Sync your voiceover or main audio first. Reduce background noise, normalize volume, and add compression if needed to keep levels consistent. Add music tracks, sound effects, or branded audio from TikTok’s library, ensuring that licensing is allowed if monetizing. Balance audio levels between dialogue, music, and effects; dialogue should always remain clear. Export a short preview to mobile devices and test earphones and phone speakers, as most TikTok consumption happens on small devices.
Workflow Step 6: Captions and Text Overlays: Adding captions improves engagement, retention, and accessibility. Use concise text that emphasizes key points or punchlines. Fonts should be readable on small screens. Avoid cluttering the video; strategically place captions to match the pace of speech or actions. Branded watermarks or lower-thirds can be added without obscuring content. TikTok in-app captioning can be used, but pre-rendered captions in professional software allow consistent style across multiple videos.
Workflow Step 7: Exporting for TikTok: Export in vertical 9:16, resolution 1080×1920 (4K optional). Use H.264 codec for compatibility, bitrate between 8–12 Mbps for high quality without huge file size. Frame rate should match the source footage (30fps or 60fps). Ensure audio is AAC, 44.1kHz, stereo. Naming conventions should include video title or hashtags if you plan batch uploads. Test exported file on a phone before posting to confirm clarity, aspect ratio, and audio balance.
For detailed editing tutorials, see Adobe Video Editing Tutorials for guides integrating technical editing with TikTok monetization strategies, audience retention tactics, and brand-ready content production.
