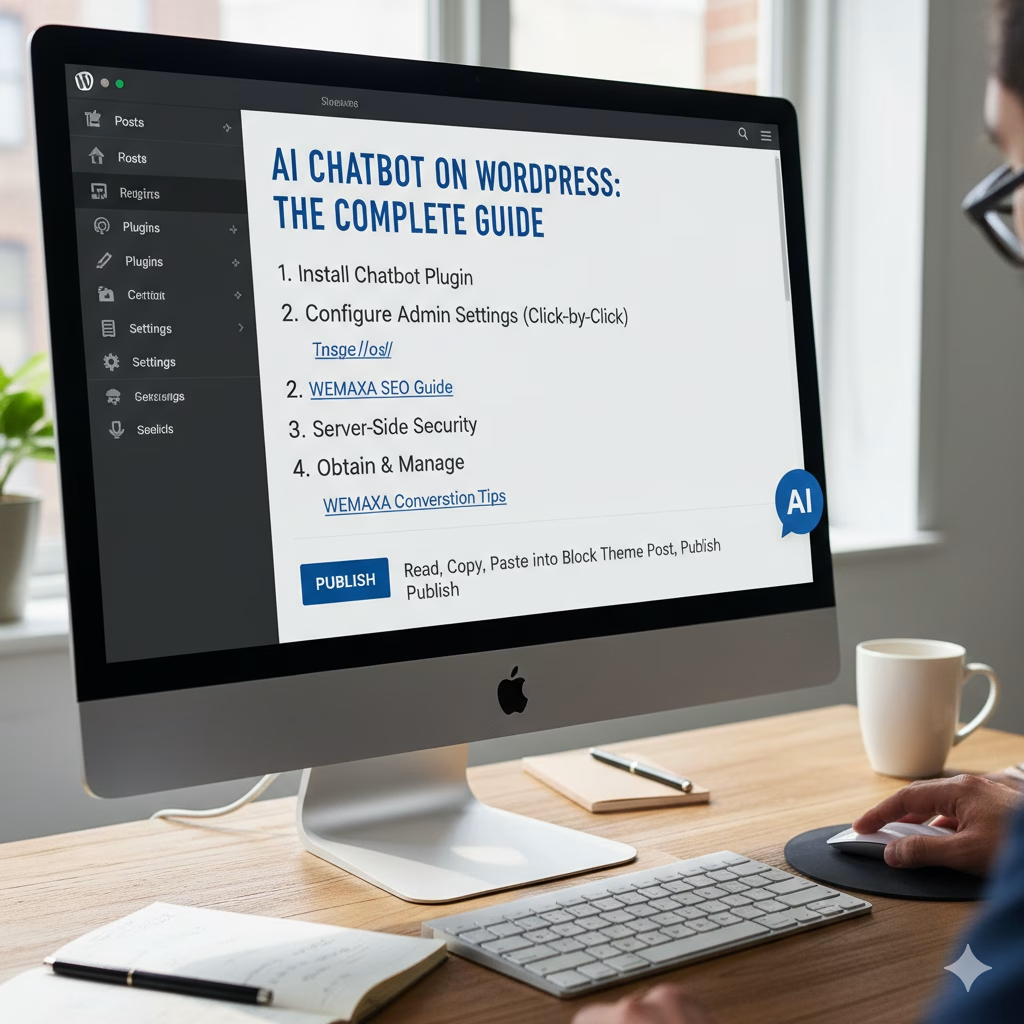
This guide lists every practical method to add an AI chatbot to a WordPress site, step by step instructions for installing plugins, exact admin clicks for configuration, server side best practices for security, and how to obtain and manage an OpenAI API key. Internal Wemaxa links are included for SEO placement and conversion. Read, copy, paste into a block theme post, publish.

Quick links used in this guide
OpenAI quickstart documentation: https://platform.openai.com/docs/quickstart
OpenAI API keys page: https://platform.openai.com/account/api-keys
OpenAI pricing overview: https://openai.com/api/pricing/
AI Power plugin on WordPress.org: https://wordpress.org/plugins/gpt3-ai-content-generator/
AI Engine plugin on WordPress.org: https://wordpress.org/plugins/ai-engine/
Chat with GPT plugin on WordPress.org: https://wordpress.org/plugins/chat-with-gpt/
WPBot chatbot plugin on WordPress.org: https://wordpress.org/plugins/chatbot/
AI Power commercial website: https://aipower.org/features/
Meowapps AI Engine product page: https://meowapps.com/ai-engine/

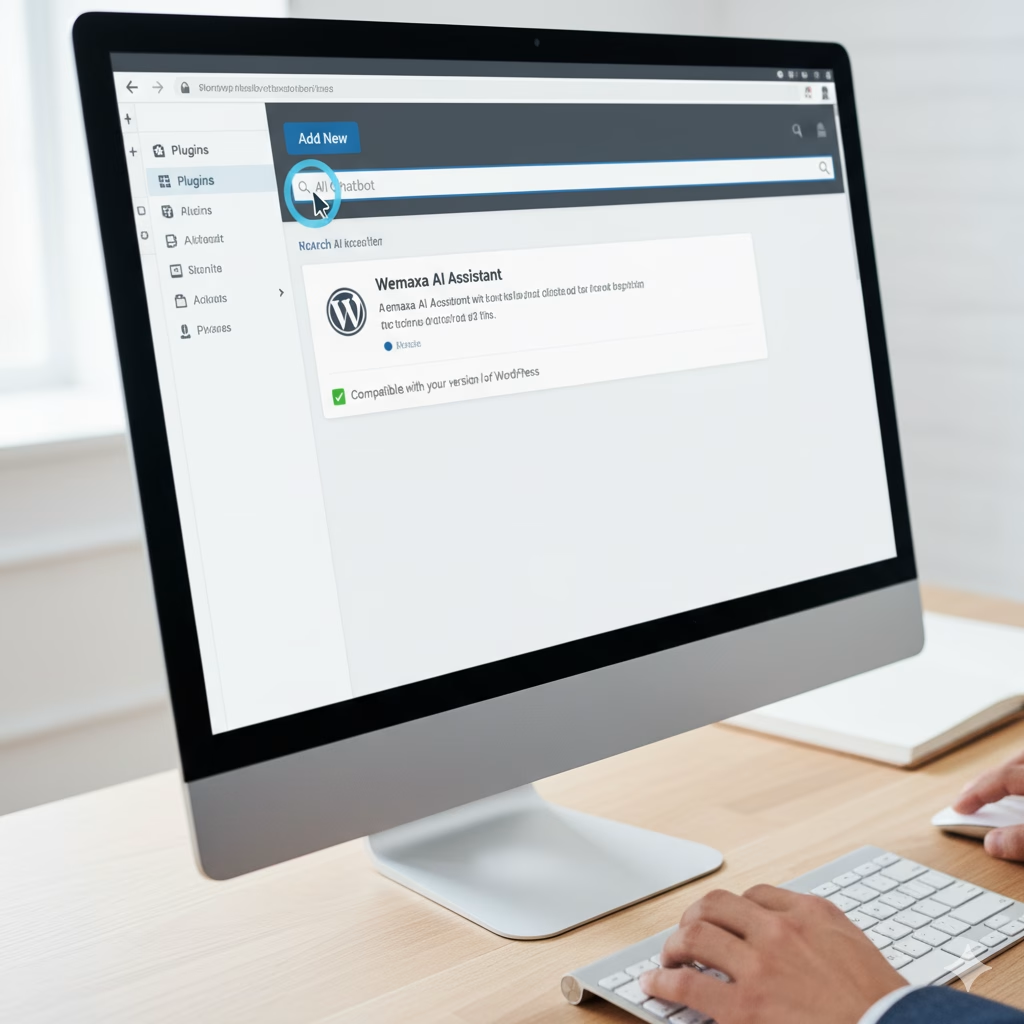
Page 1 installing a plugin chat widget using WordPress admin
Step 1 Log in to WordPress admin for the target site.
Step 2 Dashboard > Plugins > Add New. In the search box type the plugin name. Example options to search for: AI Power, AI Engine, Chat with GPT, WPBot. Select the entry that matches the official plugin page on WordPress.org. Click Install Now. Click Activate.
Step 3 After activation go to the plugin menu entry that appears in the left sidebar. Example labels: AI Power, AI Engine, Chat with GPT, ChatBot. Click Settings.
Step 4 Most plugins require an API key. Open the plugin settings page, find API Key, OpenAI Key, or Provider settings. There will be a field to paste your secret key. Leave this browser tab open while you create the key in the OpenAI dashboard.
Step 5 Save settings. Use the plugin test chat UI or the built in widget preview to verify the bot answers simple prompts like Hello my name is TestUser. If nothing happens check browser console for errors, server error logs for PHP errors, and confirm the API key is correct.

Notes on plugin choice
AI Power is a broad toolkit with chatbot, content generation, PDF chat, and external model support. It is suitable when you want integrated content workflows. AI Engine is lean with focus on chatbots forms copilot features. Chat with GPT and WPBot provide simpler chat widgets with less overhead. Choose based on required features, traffic volume, and cost. For large traffic use a server side proxy and caching layer.
Page 2 obtaining an OpenAI API key step by step
Step 1 Open a new browser tab. Go to the OpenAI quickstart documentation to confirm the current signup flow. Use this link: OpenAI quickstart.
Step 2 Create an OpenAI account at https://platform.openai.com/. Follow email verification and phone verification steps required by the platform.
Step 3 After login click your account icon top right then View API keys or go direct to https://platform.openai.com/account/api-keys. Click Create new secret key. Copy the key immediately to a secure password manager. The key will not be shown again.
Step 4 Configure billing. OpenAI requires payment method for production usage. Go to the billing section from the account menu or use the pricing link https://openai.com/api/pricing/ to review costs per model. Enter your payment method on the billing page. Create usage alerts and limits inside the OpenAI billing console to avoid surprise charges.
Step 5 Paste the secret key into the plugin settings field on your WordPress site. Save changes. Test the integration. If the plugin supports model selection pick a model suitable for your budget and latency requirements. Cheaper models use fewer tokens per request.
Important fact
OpenAI or any other commercial LLM provider bills for API usage. There is no reliable long term free model for production chatbots. Plan for token based costs, monitoring, and rate limiting to control spend.
Page 3 server side best practices for production
Do not embed your raw secret key in client side JavaScript. Use server side code or plugin server endpoints that keep the secret on the server. Protect plugin settings pages with strong admin permissions. Use HTTPS only for site traffic. Implement rate limiting on your site, cache repeated responses where appropriate, apply request size limits to avoid huge token bills, and log usage for billing reconciliation.
When using PDF chat or site search memory features limit the context window size. Trim user uploads before sending to the LLM. If your plugin supports streaming responses enable it only after you confirm server resource capacity.
Page 4 SEO and internal linking plan for Wemaxa
Place this guide on a dedicated URL such as /ai-integration. On the home page add a contextual link anchor AI Integration pointing to /ai-integration. From Services page link the specific section Use Chatbots linking to the anchor #chatbots inside the new guide. From Pricing page add a line about AI integration services linking to the enterprise contact page at https://www.wemaxa.com/enterprise. From FAQ add a question About AI chatbots with an internal link to /ai-integration#faq. Ensure schema markup for FAQ sections is present for search engine snippets.
Page 5 debugging checklist
1) Confirm API key presence in plugin settings. 2) Confirm billing active in OpenAI console. 3) Check browser console for CORS or JS errors. 4) Check PHP error logs for plugin fatal errors. 5) Use curl from the server to make a test API call to OpenAI endpoints to confirm network connectivity. 6) If responses are empty increase timeout settings for remote requests.
Appendix plugins quick install clicks
Dashboard > Plugins > Add New > Search “AI Power” > Install Now > Activate > AI Power > Settings > API provider > OpenAI > Paste key > Save.
Dashboard > Plugins > Add New > Search “AI Engine” > Install Now > Activate > AI Engine > AI Settings > Connect provider > Paste key > Save.
Dashboard > Plugins > Add New > Search “Chat with GPT” > Install Now > Activate > Chat with GPT > Settings > API Key field > Paste key > Save. Place short code or widget in footer or theme block.

Final note
Links above were checked for validity while this guide was prepared. For up to date API docs consult the OpenAI quickstart and account pages linked earlier. For plugin feature comparisons review the official WordPress.org plugin pages linked earlier.
AI Chatbot Installation Guide for WordPress
Before attempting any AI chatbot integration in WordPress, it is imperative to conduct a comprehensive system readiness audit to avoid errors during plugin installation and API communication. Start by logging into WordPress using an administrator account and navigate to Tools → Site Health. Examine each section carefully and document all relevant system information. Record the exact PHP version, database engine and version, web server software name and version, and all loaded PHP extensions such as curl, mbstring, json, and openssl. Verify PHP memory limits, maximum execution time, and any active object cache adapters. Confirm that HTTPS is valid by opening the site in a private browser window and clicking the padlock icon to review certificate details. If the system is missing any required extensions or TLS is invalid, do not proceed; request host support to resolve these issues.
Step one: Log in to WordPress as an administrator, then open Tools → Site Health and record PHP version, database engine, webserver type, loaded extensions, memory limits, and HTTPS certificate information.
Step two: If any PHP extension or system requirement is missing, contact the hosting provider or schedule an upgrade to a supported PHP release before proceeding.
Step three: Verify TLS/SSL validity by opening the site in a private browser session and checking the certificate’s issuer, expiry, and validity status.
Step four: If SSH access is available, run a connectivity test to the AI provider endpoint. Example command:
curl https://api.openai.com/v1/models.
If it fails due to connection refused or DNS errors, open a support ticket to enable outbound HTTPS.
Step five: If SSH is unavailable, request network test documentation from your host proving outbound HTTPS connectivity and attach it to your installation checklist.
Step six: Store all audit notes in a single timestamped text file with the person responsible for reproducibility and future debugging.

Once system readiness is confirmed, creating reliable backups is crucial. Full backups of both WordPress files and the database prevent irrecoverable data loss. If your host supports snapshots, use this feature as it allows faster restoration compared to manual backups. If snapshots are unavailable, install a trusted backup plugin such as UpdraftPlus or use a migration tool like All-in-One WP Migration. Command-line administrators can export the database using mysqldump and archive web files with tar, then transfer the archives to off-site storage for redundancy.
Step one: Create a full backup snapshot of files and database prior to installing any plugin.
Step two: If snapshots are unavailable, configure a backup plugin to write backups to remote storage or off-site locations.
Step three: For command-line usage, run:
mysqldump -u root -p database_name > /root/db-backup.sql and tar -czf /root/www-backup-$(date +%F).tar.gz /var/www/html.
Step four: Verify backup integrity by restoring the snapshot on an isolated host or unpacking archives locally to ensure WordPress loads correctly.
Step five: Create a staging copy on a subdomain or separate host that mirrors production exactly, including plugins, themes, and uploads.
Step six: Password-protect the staging environment using HTTP basic authentication or a WordPress password plugin to prevent public access and search engine indexing.

After completing the system audit and backups, the next critical phase is selecting a suitable AI chatbot plugin for WordPress. The selection process must balance feature completeness, long-term maintainability, security, and cost efficiency. Begin by defining your exact use cases, such as simple FAQ responses, support ticket triage, PDF document chat, WooCommerce product recommendations, multilingual responses, or session memory for returning users. List these features in priority order to ensure that the plugin chosen fully satisfies essential requirements without forcing workarounds that increase complexity or hidden costs.
Step one: Define all chatbot use cases, specifying priority levels and expected interactions for each. This provides a clear baseline for comparison and ensures no critical functionality is overlooked.
Step two: Search the official WordPress plugin repository at https://wordpress.org/plugins/ for AI chatbot solutions, noting plugin name, last updated date, compatibility, active installations, and average review score. Avoid relying solely on install counts; read recent support threads to confirm real-world reliability and responsiveness from the developers.
Step three: Construct a risk matrix in a spreadsheet with columns for maintenance signal, adoption signal, feature fit, secret storage method, and known integrations. Mark whether each plugin stores API keys in the database or supports server-side environment variables. Prefer plugins that keep secrets on the server side, reducing accidental exposure during backups or exports.
Installation can then proceed in multiple ways depending on your hosting constraints and workflow preferences. The most straightforward method is via the WordPress admin dashboard. Log in as an administrator, navigate to Plugins → Add New, enter the plugin name exactly, review the plugin card for compatibility, recent updates, and support threads. Click Install Now, wait until installation completes, and then click Activate. The plugin may add a new menu item in the left sidebar; follow the setup wizard carefully, paying attention to any warnings regarding missing PHP extensions or outbound connectivity. To verify layout and functionality, insert a sample shortcode or Gutenberg block on a password-protected staging page and check rendering across multiple devices.
Step four: Dashboard installation: navigate to Plugins → Add New, search plugin by exact name, verify compatibility and last update, then click Install Now > Activate.
Step five: Post-activation verification: locate plugin menu, run setup wizard, note any PHP or connectivity warnings, and copy sample shortcode or block to a staging page.
For environments where the dashboard is restricted or automation is required, use WP-CLI. Open an SSH session and navigate to the WordPress root directory. Run wp plugin install plugin_slug --activate, substituting the exact slug from WordPress.org. Capture CLI output into a log file for auditing purposes. If the installation fails, check disk space, PHP process limits, and server logs before retrying. Using WP-CLI ensures reproducible installations across staging and production environments and avoids browser timeouts.
Step six: WP-CLI installation: open SSH, navigate to site root, run wp plugin install plugin_slug --activate, redirect output to a log file, troubleshoot errors if installation fails.
When SFTP access is the only option due to host restrictions, download the plugin ZIP file from the official WordPress repository. Extract it locally, then upload the folder to /wp-content/plugins/ via SFTP. Activate it from Plugins → Installed Plugins or via WP-CLI. Initially enable minimal features to reduce token consumption and validate behavior on a staging page. Test integration with other scripts, analytics, and your theme to ensure proper operation before deploying to production.
Step seven: Manual SFTP installation: download plugin ZIP, extract locally, upload folder to /wp-content/plugins/, activate in admin or via CLI, enable minimal features first, validate on staging.
Initial plugin configuration focuses on conservative defaults and risk mitigation. Select a lower-cost AI model for testing, limit tokens per request, define maximum response lengths, and configure session retention policies. Enable logging of requests to reconcile token consumption with provider billing. Create a detailed test plan covering common user scenarios such as querying product information, uploading sample PDFs, or asking for support documentation. Record results to forecast monthly usage and cost accurately. Only after validating behavior should higher-cost models be enabled.
Step eight: Configure plugin with conservative defaults: select lower-cost model, set token limits, configure session retention, enable logging, run test scenarios, and record token usage.
Once the plugin is installed and minimally configured on a staging site, the next crucial step is creating an account with your AI provider and generating the required API keys. This step cannot be skipped, as most AI services are paid and will not operate without a valid account and key. Open a private browser window and navigate to the official provider platform, such as OpenAI at https://platform.openai.com/. Register with a business email if the chatbot is intended for commercial use. Complete the email verification step by following the link sent to your inbox, then complete any mandatory phone verification. This multi-factor verification process ensures the account is compliant with anti-abuse measures and is essential for production readiness.
Step one: Open a private browser, visit the provider site, and sign up with a business or personal email depending on context.
Step two: Complete email verification by following the confirmation link sent to your inbox. Ensure the email domain matches your intended usage (company email preferred for enterprise chatbots).
Step three: Complete phone verification by entering the code sent via SMS. This step is mandatory for most providers to reduce fraudulent usage and protect billing integrity.
After account verification, navigate to the API key section of your provider dashboard. Click Create New Secret Key and copy it immediately into a secure credential store such as a company vault or a password manager. Do not store the key in plaintext on the server or within source control, as exposure will allow anyone to use your paid AI resources. If your WordPress plugin supports server-side environment variable injection, configure the key to be read from the environment rather than being stored in the database. This method ensures that sensitive credentials are never exposed to client-side code or backups.
Step four: Navigate to API keys section in provider dashboard and click Create New Secret Key.
Step five: Copy the secret key immediately into a secure credential store or password manager; do not store in plaintext.
Step six: Configure environment variable injection for plugins that support it to prevent exposure in the database or client-side code.
Enabling billing before production deployment is critical. Add a credit card or corporate payment method in the provider’s billing dashboard. Configure soft usage alerts to warn when approaching a defined threshold, and hard caps to prevent runaway charges. Estimate monthly costs by calculating the average tokens per session, multiplied by expected sessions per day and the number of days in the month. During initial testing, use a lower-cost AI model to validate behavior and extrapolate usage to higher-tier models for accurate cost forecasting. Assign multiple billing contacts to avoid a single point of failure if alerts are triggered.
Step seven: Add a payment method in the provider dashboard and set soft alerts and hard caps.
Step eight: Estimate monthly cost using token counts per session, average daily sessions, and days per month; start with lower-cost model and adjust after validation.
Step nine: Assign multiple billing contacts to receive usage notifications and prevent single point of failure.
Understanding provider quotas and rate limits is essential to maintain a reliable user experience. Review the documentation to record per-minute, per-hour, and per-month limits, as exceeding them will result in HTTP errors. Implement a server-side rate limiting layer in your plugin or proxy server to gracefully throttle requests when thresholds are approached. Choose a provider region closest to your primary audience to minimize latency. Ensure regulatory compliance for data residency, GDPR, or other local requirements. Logging request identifiers and storing them in structured logs ensures that invoices can be reconciled with actual usage and that audit trails are maintained.
Step ten: Review provider documentation for all quotas, per-minute and monthly limits, and regional compliance requirements.
Step eleven: Implement server-side rate limiting or queuing to prevent service degradation and provide graceful fallback responses to users when thresholds are exceeded.
Step twelve: Choose provider regions close to primary audience to reduce latency and confirm data residency options if necessary for compliance.
Best practices for API key safety include periodic rotation, limiting permissions with scoped keys, maintaining a registry of which keys are used in which environments, and revoking any keys used for testing or shared insecurely. If temporary access must be given to third parties, use short-lived keys to minimize exposure. Prepare an incident response playbook that details steps to revoke compromised keys, rotate secrets, and update environment variables with minimal downtime. Following these practices ensures operational continuity and protects your AI spending from unauthorized use.
Step thirteen: Rotate keys periodically, revoke insecure keys, and maintain a registry of keys with owner and environment details.
Step fourteen: Use short-lived keys for third-party access and maintain an incident playbook for revocation and rotation procedures.
With your AI provider account, API key, and usage policies configured, the next step is embedding the chatbot into your WordPress site. For block-based themes, always prefer the plugin-supplied Gutenberg block because it integrates seamlessly with the responsive layout and editor previews. Place the block on a staging page first and test behavior across multiple screen sizes. If the plugin offers a shortcode instead, insert it into a password-protected staging page to confirm layout, CSS specificity, and responsiveness. Verify that the chat widget does not overlay critical UI elements such as primary CTAs, navigation, or purchase buttons. Use the browser inspector tool to check z-index, CSS variables, and adjust style overrides to match your site’s theme while maintaining accessibility standards for keyboard navigation and screen readers.
Step one: Use the plugin Gutenberg block for embedding; test on a staging page first.
Step two: For shortcode-based plugins, place it on a password-protected page and validate layout and CSS specificity.
Step three: Inspect with browser developer tools to check z-index, CSS conflicts, and responsive behavior across devices.
For SEO and internal linking, create a dedicated guide page at a URL such as /ai-integration. Link to this page from high-value site sections using precise, task-focused anchor text, e.g., from Services use “AI integration services,” from Pricing reference the billing section with an anchor like #billing, and from the FAQ link “Do AI chatbots work for free” to the corresponding subsection. Implement FAQ schema for all Q&A pairs, enabling search engines to surface rich results. Monitor search console data for impressions and queries, adjusting anchor text placement and frequency to prioritize high-intent traffic while avoiding authority dilution across too many internal links.
Step four: Publish the guide at a dedicated URL and set canonical for indexing.
Step five: From Services, link to the guide with task-specific anchor text to reinforce topical relevance.
Step six: Add internal links from Pricing and FAQ to relevant sections within the guide; implement FAQ schema for search engines.
Production hardening involves securing secrets, caching, fallback strategies, and observability. Never expose API keys in client-side code. Implement a server-side proxy endpoint that accepts authenticated requests, forwards sanitized queries to the provider, applies per-client rate limits, and logs all interactions for audit purposes. Layer caching so repeated high-frequency queries return cached answers from the edge while unique queries hit the provider. Implement deterministic local fallback responses for common questions to reduce token consumption. Instrument the proxy with logs and metrics to monitor health, latency, token consumption, and error rates. Configure alerts for billing thresholds, abnormal traffic spikes, and high error rates to ensure immediate operational response.
Step seven: Implement a server-side proxy for secure key handling, request sanitization, and rate limiting.
Step eight: Configure layered caching for repeated queries and deterministic local fallbacks for predictable responses.
Step nine: Add observability metrics, logs, and configure alerts for high error rates, latency, token consumption, and billing threshold breaches.
The final rollout checklist ensures production readiness. Verify that backups and snapshot restores work, environment variables and secret management are correctly configured, conservative token limits are set, and a hard billing cap is active. Confirm the server-side proxy, caching, and rate-limiting behaviors are tested under simulated load. Validate internal linking from Services, Pricing, FAQ, and Enterprise sections, and ensure schema markup is enabled for relevant FAQ or guide content. Monitor usage for at least two weeks, review conversation logs to identify repeated queries that can be turned into static FAQ pages or improved product content, and iterate on system messages and context trimming strategies to optimize AI response quality while controlling cost.
Step ten: Test backups, environment variables, token limits, billing cap, and proxy configurations in staging.
Step eleven: Verify internal linking, schema markup, and perform functional validation of the chatbot across pages and devices.
Step twelve: Monitor production usage for two weeks, analyze logs for repeated queries, create static FAQs or improve content, and iterate prompts to balance cost and response quality.
Following these detailed steps across all four pages from system audit to final rollout ensures a fully operational, secure, SEO-optimized, and cost-managed AI chatbot integrated into a WordPress block theme. Each stage emphasizes long-term reliability, compliance, and operational observability to maintain a robust user experience without incurring unnecessary provider costs.